Over time, the appearance of the "Desktop" can be pretty boring. Many users are limited to a simple wallpaper change. The fresh main window image, however, can be supplemented with new shortcut icons. How to change different types of icons, we will consider in this article.
Standard or third-party icons in ico format
First you need to decide what icons you need: classic from Microsoft, which are already stored in the PC's memory, or third-party images. In the second case, you must first create a picture yourself or find an image on the Internet. The main condition is that it must be small and have an ico extension.
You can find ready-made icon files with different designs on third-party resources and download them from there, and then install in any of the following ways, depending on the type of icon (folder, application shortcut or the main Windows icon). To search use Google services or Yandex: enter the query "Desktop icons for Windows 10" into the line. The variety of icons available for download on the Internet is quite large: author's, thematic, standard for certain versions Windows and stuff.
You can change icons for all shortcuts at the same time using an icon pack - a separate collection of icons packed into one file with the dll extension. Such packages can also be downloaded from various sources. However, be careful when searching for and downloading such files: trust sites that have a mark that the files have been scanned by antivirus. Otherwise, you run the risk of downloading a malicious program along with the file.
Photo Gallery: Icon Sets for the "Desktop"
The shortcuts on the "Desktop" can be non-standard, but they must be in the ico format. On the Internet you can find many original icons for folders. The Aero icon pack is suitable for users who love modern design. The choice of icons on the Internet is great: from simple to thematic and author's
How to change the appearance of the main icons on Windows 10
The main Windows icons on the "Desktop" - icons with the names "Trash", "My Computer", "Network", "User files", "Control Panel" and some others. They are placed on the Desktop by default after installation. You can independently determine which of them should be present on it and which should not. You also have the right to change their appearance in the system window "Options" or using third-party utilities.
Through the Windows Settings window
The easiest way to change the appearance of the main icon is to go to the window with system parameters:
- To make the "Options" window appear on the display, the easiest way is to simultaneously press two keys: Win + I. But this combination may not work. In this case, there is another way: click on the "Start" button in the lower left corner of the screen, and in the menu itself, select the second icon from the bottom - the gear.
 Click on the gear icon in the Start menu
 - We get into a large menu "Options" with many sections. We need the last tile in the first row - "Personalization".
 In the "Options" window, click on the "Personalization" section
 - The desired tabbed section will open. You can launch the same window in another way: click on the "Desktop" on the area free of icons, and in the context menu select the very last item - "Personalization".
 Click on the item "Personalization" in the context menu of the "Desktop"
 - Go to the "Themes" block.
 Go immediately from the "Background" tab to "Themes"
 - In the right column with links to other windows and sections, click on the line "Desktop icons settings".
 Click on the link "Desktop icons settings" on the right side of the window
 - A small window will open on top of the "Parameters" - select the desired icon in the menu with the left mouse button, for example, "This computer". Next, click on the "Change icon" button.
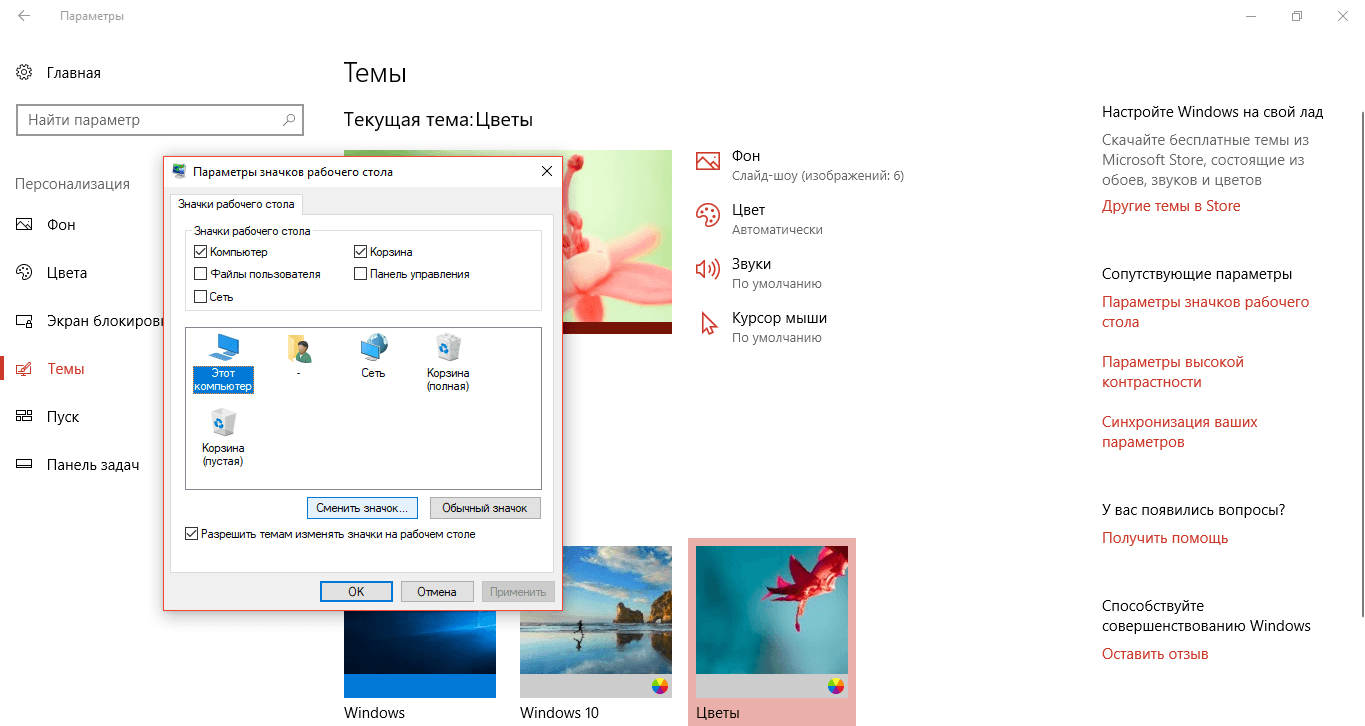 Click on the icon that you want to change and click on the button "Change icon"
 - In the third window, select an icon from the list of standard Windows icons, or load your own using the "Browse" button.
 Choose an icon from the available ones or load your own using the "Browse" button
 - If you chose the second option (loading your icons), the "Explorer" window will appear. We are looking for a folder with the desired icon file in the ico format. Click on the "Open" button and then click OK.
 Find in "Explorer" desired file ico and click on "Open"
 - In the "Icon Options" window, first click "Apply" for all changes to take effect. If you want to change the icon for other main Windows icons, repeat the same procedure for each of them. Click on "Apply" again and then on OK to close the window.
Using special utilities
There are many applications from various developers that allow you to change the icons of both the main shortcuts and other icons, for example, folder icons, beyond recognition. In programs, you can change both individual icons and all icons at once, that is, install the whole package.
IconPackager: convenient and fine-tuning the appearance of icons
IconPackager is a product from Stardock that develops utilities for customizing the Windows desktop interface. Several icon packs are preinstalled in this utility. There is also an opportunity to upload your own and change icons in the available collections, that is, create your own unique packages.
The utility supports Windows versions higher than "seven". Its downside is that it is paid, but at the beginning a month of free testing is offered. Although the interface is in English, it is quite convenient to use the application:
- Open the official website of the app developer. To download the installer, click on the blue Try It Free button.
 Click on the blue Try It Free button to download the installer
 - Run the installer and install the program by following simple instructions in the window.
- Click on the Finish button so that the application window appears on the display.
 Click on Finish to close the "Installation Wizard" and open the program window
 - To start using the trial version, click on the Start 30 Day Trial button.
 Click on Start 30 Day Trial to start using the program for free for a month
 - If you want to download a third-party icon that you downloaded from the Internet, in the Look & Feel tab, click on the Icon Package Options drop-down menu. We select the penultimate item Add Icon Package in it, and then Install from disk.
 Click on Add Icon Package and then select Install from disk to upload your collection
 - In Windows Explorer, find the file with the icon pack and click on “Open” - the collection will be added to the list of currently available ones.
- You can also choose a theme from those presented in the list. Let's try to put, for example, Delta.
 Click on the Delta package below
 - Click on Preview to preview all the icons in this pack. If you like them, close the second window and boldly click on the Apply icons to my desktop button.
 Click on Preview to preview the entire collection of icons
 - If you want to bring back the old ones Windows icons in place, just apply the first theme in the list - Windows Default Icons.
- In the Colors tab, you can change the color, tint, brightness of the icons.
 In the Colors tab, adjust the colors of the available icons
 - With the help of the item I want to adjust the color of my Icon Package you can adjust the icons to the theme of your "Desktop" and to the color of the "Taskbar". For example, they can completely change the color to red if there is a Windows theme with that shade. After all the changes, click on Apply icons to my desktop.
 Icons can match the color of the current Windows theme
 - In the Live Folders section, you can put separate icons for folders - live icons. To do this, check the box to the left of Always use the Live Folder icons selected below. Then just select the type of folders.
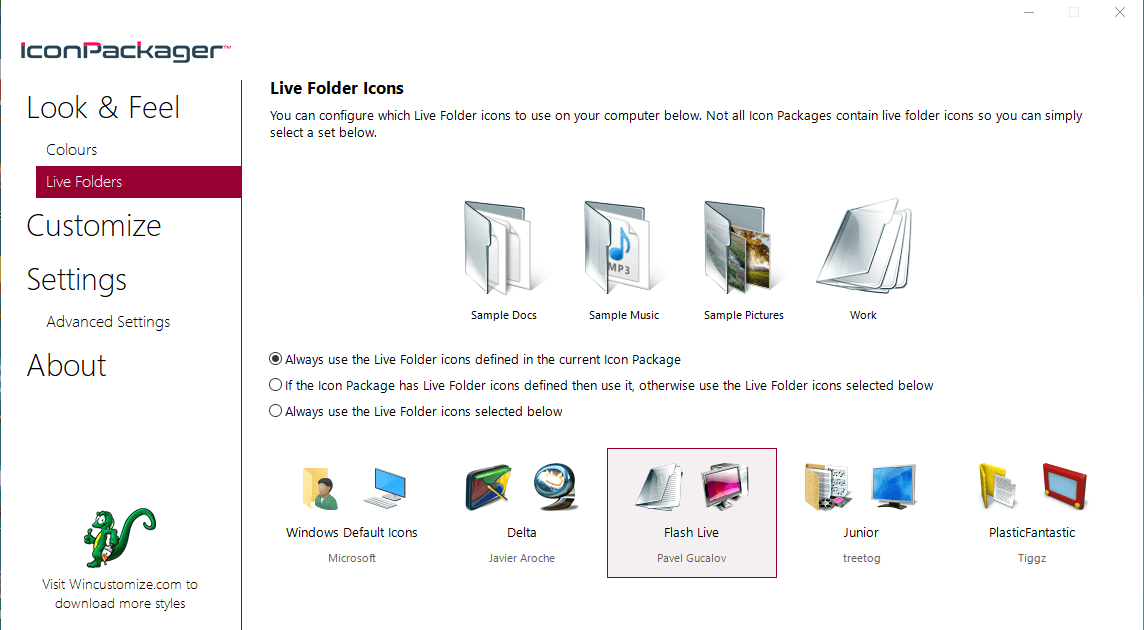 In the Live Folders block, select individual icons for folders
 - The Customize tab allows you to create your own icon packs. To change a specific icon, click on Change this Icon.
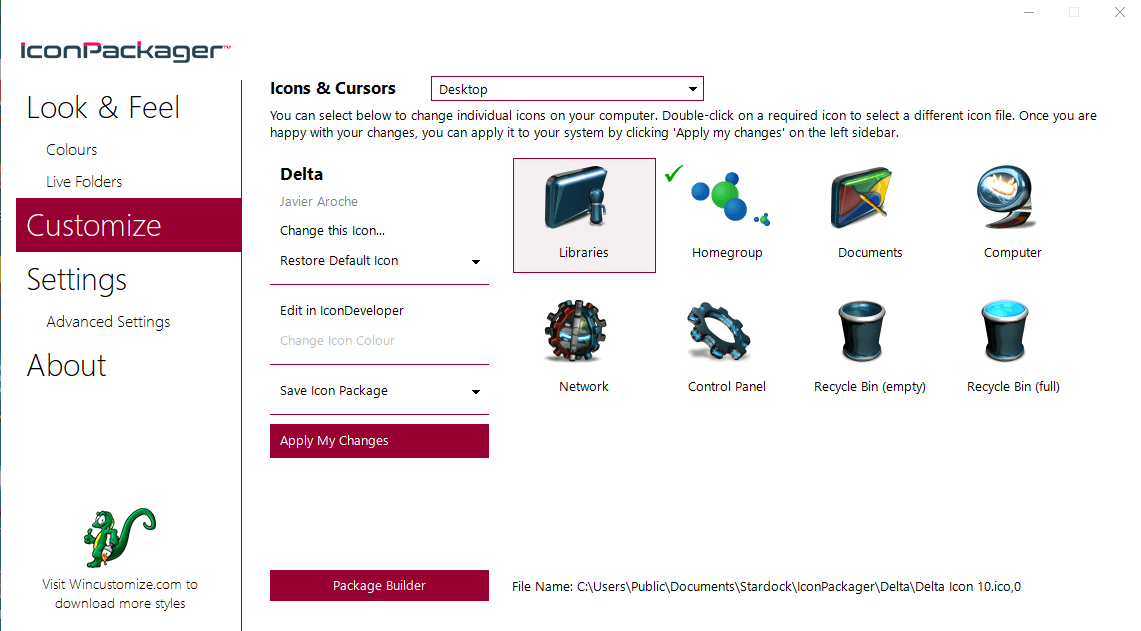 The Customize section allows you to create your own collections and change those presented in the program
 - In the new small window select from the available ones or add your own icon using the Browse button.
 In the Change Icon window, select an icon from those available in the menu, or upload your own using the Browse button
 - When all changes are made to the package, click on Save Icon Package.
 Save changes to the icon package using the Save Icon Package option
 - In a small window, confirm that you want to make changes to the package. After that, all settings should be successfully saved.
 Click "Yes" to confirm your intention to save the changes
 - In the Settings section there is additional settings... In particular, you can determine which Windows icons should be changed and which ones should not be touched. Here you can enable the Cursors mouse pointer change.
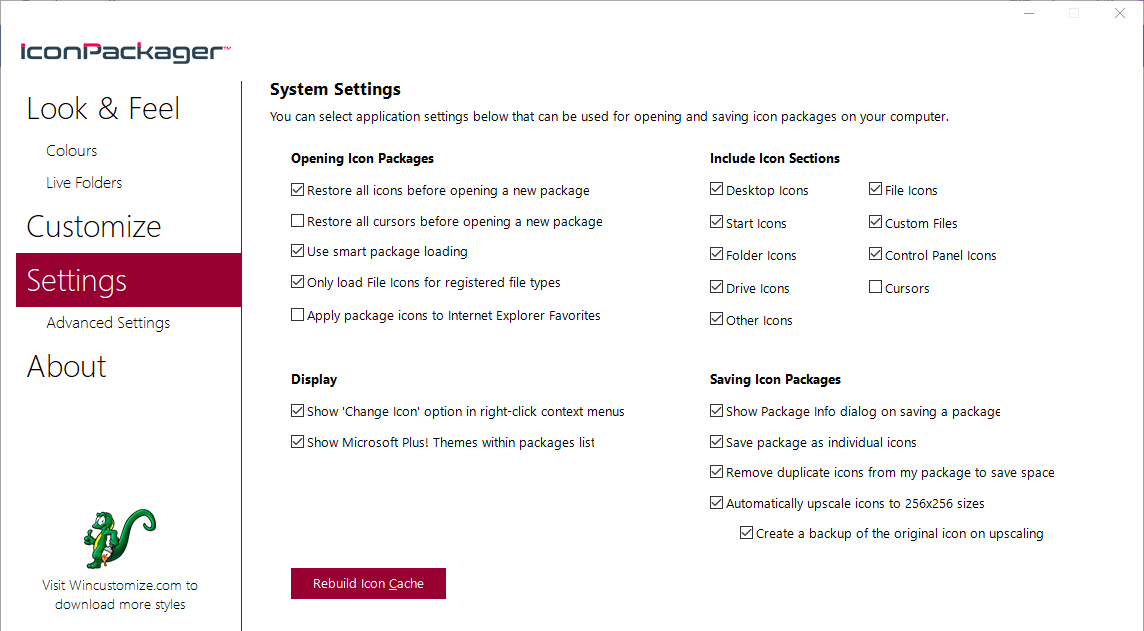 In the Settings tab, you can configure the change for certain types of icons: folders, files, main Windows icons and others
Video: how to install new icons using IconPackager
Se7en Theme Source Patcher: Free Utility & Large Selection of Packages
The application is intended to replace all the classic icons of the "Desktop", local hard drives, folders, as well as the icons of the "Control Panel". Initially, the program was created for the "seven", but now it supports other versions of Windows, in particular, our "ten".
The program uses the popular 7z compression format. The downside of the utility is that icon packs are not initially built into it. You need to download all collections on the same site from where you download the application, and then add them yourself to the utility database for further use. Nevertheless, the choice of packages on this resource is very large.
The advantage of this program is that it is free. Before replacing icons, the utility creates a restore point and a backup system files so that you can return all Windows icons to the classic ones:
- Moving on to applications. Click on the "Download" button.
 Click on the "Download" button to download the executable file of the program
 - Your browser will download the archive - open it, right-click on the file in it and click on "Extract to ..." in the menu. Select a folder and unzip the archive.
 Click on "Extract to specified folder" in the context menu of the file
 - Find the extracted file, right-click on it again and click on the "Run as administrator" link in the context menu.
 In the context menu of the unpacked file, click on "Run as administrator"
 - Allow this application to make changes on your PC by clicking "Yes" in the system window that appears. The application does not require installation, so its window will open immediately.
 Click "Yes" to allow the program to make changes on the device
 - Pre-select and download the themes you like from the same site.
 Download the icon pack you like on the developer's site
 - In the application window, click Add a Custom Pack.
 Click on the Add a Custom Pack button
 - In Windows Explorer, select the downloaded icon pack archive and click Open.
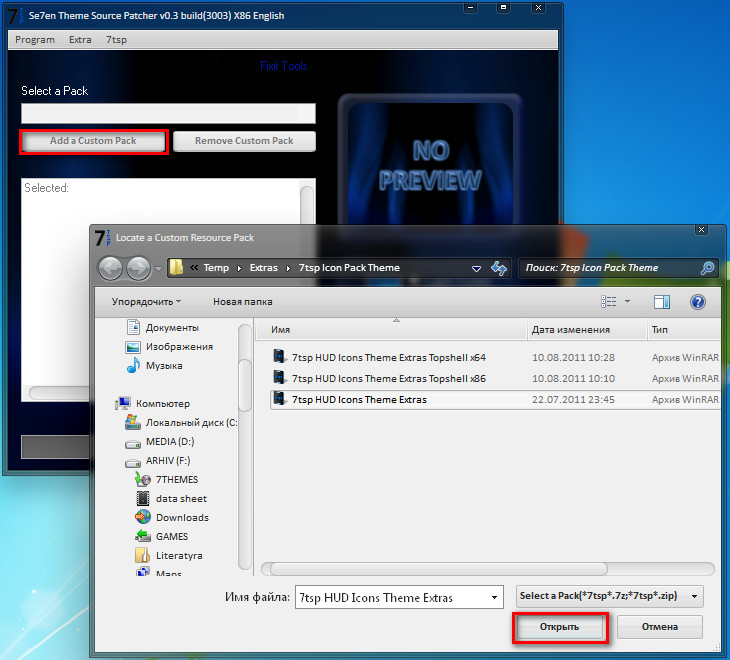 Find the file with the icon pack and click "Open"
 - The collection will appear in the menu. At the bottom of the window there will be a Start Patching button. Click on it. The utility will ask if you need to create a restore point. Be sure to create - click "Yes".
 Give permission to create backup before installing new icons
 - Wait for the procedure to complete. After that, you need to reboot the device two times for the changes to take effect.
- Icon packs from this developer contain not only icons, but also some other elements of the Windows interface, for example, pictures to replace the view of the clock, date, and even the Task Manager window. If you do not need them, before installing the collection, click on the Extra item. In the Option Menu, uncheck unnecessary items and click Save.
 In the Option Menu, remove unnecessary items that you do not want to change and click on Save
 - If you want to restore classic Windows icons, click in the program window on the Restore button in the lower right corner. In the new window, check the box next to the first item and click on OK.
 To return to the default Windows icons, click Restore and then OK
It is imperative to install a new icon pack on clean system, that is, to classic images of icons in Windows, and not to third-party icons. Therefore, make a preliminary restore using the Restore button, if you have icons that differ from the standard ones.
Video: how to set icons using the Theme Source Patcher utility
IconTo: app with built-in instructions for use
IconTo - free app from the developer AleXStam, which can change icons for system elements, folders, hard disk partitions or even their groups.
 In IconTo you can change the icons of folders, system objects and hard disk partitions
 It has the following advantages over other utilities:
- More than 300 built-in icons. There is also the option to upload your own icons.
- Instructions for installing icons: at the bottom of the window you will see tips.
- Conversion available png formats, jpg, ico, as well as the option to extract images from files in dll, exe and some other format.
- The program interface is completely in Russian.
IconTo is suitable for all versions of Windows, from Windows 98 to the modern "ten". The size of the downloaded installer does not exceed 15.1 MB, so the utility can be used on computers with a small amount of memory. The application is available for download on the official website of the developer.
How to change the folder icon on Windows 10
If you want to highlight a folder on the general background of icons to make it more recognizable, follow these steps:
- Click on the folder shortcut with the right mouse button. In the menu that appears, click on the "Properties" item.
 In the context menu of the folder, select the item "Properties"
 - A window with various sections will immediately appear on the display - go to the "Settings" tab. In the last section, click on the "Change Icon" button.
 In the "Settings" tab, click on the "Change icon" button
 - Select an icon from the available ones: Scroll to the right of the icon list to see all the shortcuts. If you have your own image with the required ico format and you want to put it exactly, click "Browse".
 Select an icon among the proposed ones or click on the "Browse" button if you have your own icon
 - In the additional Windows Explorer window, find the folder where the image is stored. Left-click on it to select it, and then click on "Open".
 Find the desired icon in the form of a file with the extension ico in Windows Explorer
 - For a convenient search, you can use the line with a magnifying glass - just enter the name of the icon file or the extension ico.
 Enter ico in the search box and find the file you want
 - To save the changes, click OK in the window with the list of available icons. After that, the folder icon will change.
How to replace all folder icons at the same time
To change the appearance of all folders, you need to resort to a more complex method - editing the registry in the system window. However, this method is not recommended for beginners: it is better to use the special programs described in the "Using special utilities" section of this article. If you are already a confident PC user, then you can perform manipulations in the system window:
- To call the system window "Registry Editor" simultaneously press the keys Win and R - a small panel "Run" with a single line "Open" will open. In it we type the regedit command. For the system to execute it, click on OK or press Enter.
 In the Run window write the regedit command
 - In the next window, click "Yes". This will give the Registry Editor permission to make changes on the computer.
 Click "Yes" to allow the system utility to make changes on the device
 - First, let's make a backup in case of incorrect editing of the registry. On the top panel find the item "File" and click on it with the left mouse button. In the menu that appears, click on "Export".
 In the "File" menu, select the "Export" item
 - In a new window that opens, select the folder in which the copy will be stored. We give the appropriate name to the file. Then click "Save".
 We name and save a copy in any folder
 - Now you can start editing yourself. Double click on the third main branch - HKEY_LOCAL_MACHINE.
 Open the HKEY_LOCAL_MACHINE folder by double clicking
 - We turn one by one into the following blocks in the same left part of the window: Microsoft - Windows - CurrentVersion - Explorer - Shell Icons.
 The Shell Icons folder should be in the Explorer section
 - If you didn’t find the last Shell Icons folder, create this section yourself: right-click on the Explorer section, select “Create” in the context menu, and then click on the “Section” item. We name it appropriately.
 If you do not have a Shell Icons folder, create it using the context menu of the Explorer section
 - Click on Shell Icons. On the right panel, right-click on an empty area to open the menu. In it, select "Create", and then - "String parameter". As a name for new entry register number 3.
 Click on "Create", and then - "String parameter"
 - Right-click on it and select "Change". You can also just double-click on it with the left mouse button.
 Click on "Change" in the context menu of the newly created parameter
 - In a small window, in the line for the value of the record, insert the path to the file, where its name and extension ico must be indicated. Click on OK.
 In the line "Value" we write the path to the ico file, which should be set as an icon
 - If you are on a 64-bit system, the path to the final Shell Icons folder in the left pane will be slightly different: Wow6432Node - Microsoft - Windows - CurrentVersion - Explorer. Then we repeat the same steps as for a 32-bit system.
- Close all windows and restart the device. After starting the OS, you will see that the icons of all folders have changed.
Change application shortcut icon
If you are tired of the old icons of shortcuts for your programs, try replacing them. For example, let's take the shortcut of a popular browser. Google chrome:
- We are looking for the desired icon on the "Desktop" (in our case, it is the "Google Chrome" icon). Click on it with the right mouse button to bring up a context menu with a list of options. We select the same item as in the case of changing the folder icon - "Properties".
 Click on the "Properties" item in the context menu of the Google Chrome shortcut
 - You will immediately be taken to the desired tab - "Shortcut". Click on the middle button "Change icon".
 In the "Label" section, click on the "Change icon" button
 - A window similar to the one in the instructions for changing the folder icon will appear on the display. Here, however, there won't be such a large selection of icons. We specify not the system library as the source, but the chrome.exe executable file. We make a choice, for example, in favor of the original yellow icon. Click on OK.
 Select an icon from the available ones or upload your file with the extension ico
 - In the window with the properties of the shortcut, first click "Apply". The system will ask for permission to make changes. Click on the "Continue" button.
 Click on the "Continue" button to save all changes
 - After that, click on OK - the window will close, and the icon icon will change.
- If you want to change the shortcut icon to your own, use the Browse button to upload your own file with a third-party image.
How to create an icon yourself
If you want to install your image (drawn or downloaded from any site) with the png or jpg extension as an icon, you need to reduce its size if necessary using the standard Windows utilities Paint, and then convert it to an ico file using special services - converters.
An easier way is to use the services of online and software icon generators, which are already configured to create files with a certain format and other parameters, for example, image sizes. For example, let's take the program IcoFX, which combines an icon generator and a tool for drawing and editing pictures. It is paid, but its developer, IcoFX Software, provides 30 days of free use. How to use it, we will tell you in the instructions:
 On the initial page of the program, click on Windows Icon From Image if you want to upload an image
 This will launch a page with a set of image editing tools
 Click on the Magic Wand on the left vertical panel
 In the right pane, select the checkerboard tile to make the background transparent.
 Click Save to save the edited image
 Find the folder where you want to save the future icon and click on "Save"
 Select the size and quality of the color of the future drawing
If you are no longer attracted by the look of old icons on the "Desktop", change them either to other classic icons for Windows, or to your own - any small images in ico format found on the Internet or drawn by yourself. To change icons, you can use both built-in Windows tools and third-party applications.
Desktop icons Windows desktop 10, as well as in File Explorer and in the taskbar, are "standard" size, which may not be suitable for all users. Of course, you can use the scaling options, but this is not always the best way to resize labels and other icons.
To resize icons in Windows Explorer 10, all the same methods are available that were described for desktop icons. Additionally, in the "View" menu of the explorer there is an item "Huge icons" and display options in the form of a list, table or tile (there are no such items on the desktop).
![]()
When you increase or decrease the size of icons in Explorer, there is one peculiarity: only the sizes in the current folder are changed. If you want to apply the same dimensions to all other folders, use the following method:

After that, in all folders, the icons will be displayed in the same form as in the folder you configured (Note: works for simple folders on disk, to system folders, such as "Downloads", "Documents", "Pictures" and other parameters will have to be applied separately).
How to resize icons on the taskbar
Unfortunately, the ability to resize the icons on the panel Windows tasks 10 is not much, but it is still possible.
If you need to make the icons smaller, all you need to do is right-click anywhere on the empty taskbar and open the Taskbar Options context menu item. In the opened taskbar options window, enable the "Use small taskbar buttons" item.
![]()
Increasing the icons in this case is more difficult: the only way to make it systematic Windows tools 10 - use the scaling options (this will also change the scale of other interface elements):
After changing the scale, you will need to log out and log back in for the changes to take effect, the result may look something like the screenshot below.
![]()
Additional Information
When you resize icons on the desktop and in Windows 10 Explorer using the described methods, their captions remain the same size, and the horizontal and vertical spacing is set by the system. But this can be changed if desired.
The easiest way to do this is to use the free Winaero Tweaker utility, in which in the Advanced Appearance Setup section there is the Icons item, which allows you to configure:
Most PC users prefer pinning their favorite programs to the taskbar for quick and easy access. In addition to the mouse, programs pinned to the taskbar can also be launched using keyboard shortcuts.
The icons for some of the programs there are outdated and they don't look nice on a modern operating system like Windows 10. Additionally, users who have customized their Windows 10 desktop can also change the icons on the taskbar for pinned programs to match their desktop. table.
Changing the program icons on the taskbar is a relatively easy task and can be done without the help of third-party applications.
Please note that in currently it is not possible to change icons for applications pinned to the taskbar. You can change system tray icons for classic desktop programs only. We'll update this guide if and when we manage to easily change the system tray icons for apps.
Change system tray icons for programs in Windows 10
Complete the instructions below to change the icon of a program pinned to the Windows 10 taskbar.
Step 1. Pin your favorite programs to the taskbar. To do this, when the program is running, just click on its icon on the taskbar right click and select the item Pin ontaskbar.
Step 3: In the list, click right click program name and select Properties.
Step 4: Under the tab Label, press the button Change Icon.
NOTE. If you do not see the Shortcut tab, it is most likely because you did not bind the program to the taskbar as mentioned in step 1 of this tutorial.
Step 5: Click the button Overview to navigate to the icon file that you want to use as the program icon on the taskbar, select the icon file and click Open... Click the button OK.
Remember that the icon you want to use must be in .ico format. If you have an image file then use free online services or tools to convert images to .ico format.
Step 6: Finally, press the button Apply to change the program's taskbar icon. If the old icon is still displayed, log out and then log back in or restart your computer.
To restore the original program icon, simply unpin the program from the taskbar and then pin it again. It's that simple!
By releasing a new operating system Windows 10, Microsoft gave it many new features and significantly redesigned the system. The desktop icons were also changed. A lot of users got used to the old icons that were present on Windows 7. Therefore, non-standard icons after switching to the new Windows 10 did not like many PC users. IN new windows 10, they can be easily changed for any shortcut on the desktop. In this article, we will describe all the ways to change icons in Windows 10. In addition, we will describe the process of creating new icons.
Change the icons of the main desktop shortcuts
Basic desktop shortcuts include links such as “ This computer», « Control Panel», « Basket". To change these icons, you need to go to the panel “ Parameters"To links" PERSONALIZATION / Themes».

Now let's try to change the shortcut “ Basket". To do this, select the basket and click on the Change icon button.

In the list of shortcuts that appears, we will select the one we like and confirm our decision with the Apply button. Below is a basket with a different image.

Also, users can use icons that are not standard Windows libraries 10, but from third-party sources. One such source is the free icon pack “ Open Icon Library". You can download this package from its official website https://sourceforge.net/projects/openiconlibrary. After downloading and unpacking the archive, you will have access to about 10 thousand icons of various formats. To use them from the "Open Icon Library", click on the same Change icon for the cart shortcut button. In the window that appears, click on the Browse button. ... ... ... After that, select one of the "Open Icon Library" shortcuts. Below is a shopping cart using pictures from the Open Icon Library.

What shortcuts on the Windows 10 desktop can be changed
The main desktop elements for which you can change icons are shortcuts (links to programs, files, and folders) and folders. Let's describe an example of changing an icon in Google Chrome. To do this, go to the properties of the browser shortcut.

Now if we click on the button Change icon. ... ..., then we will have four options for choosing an icon.

From the example you can see that when we get to the icon selection list window, the same window appears in front of us as in the first example. The only difference is that all icons are taken not from the system library, but from the "chrome.exe" executable file. In this window, just like in the first example, you can select an icon from “ Open Icon Library"Or any other.
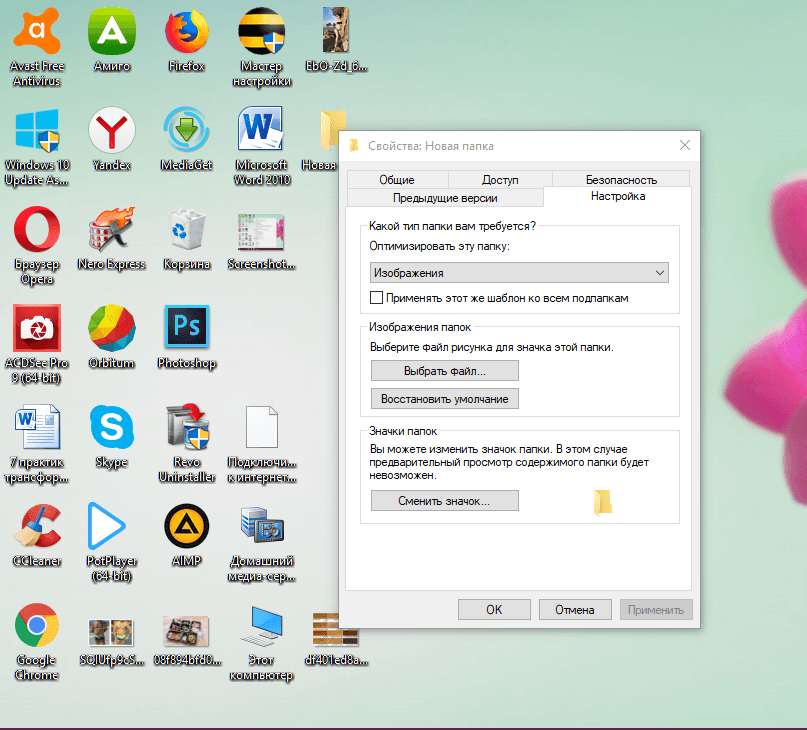
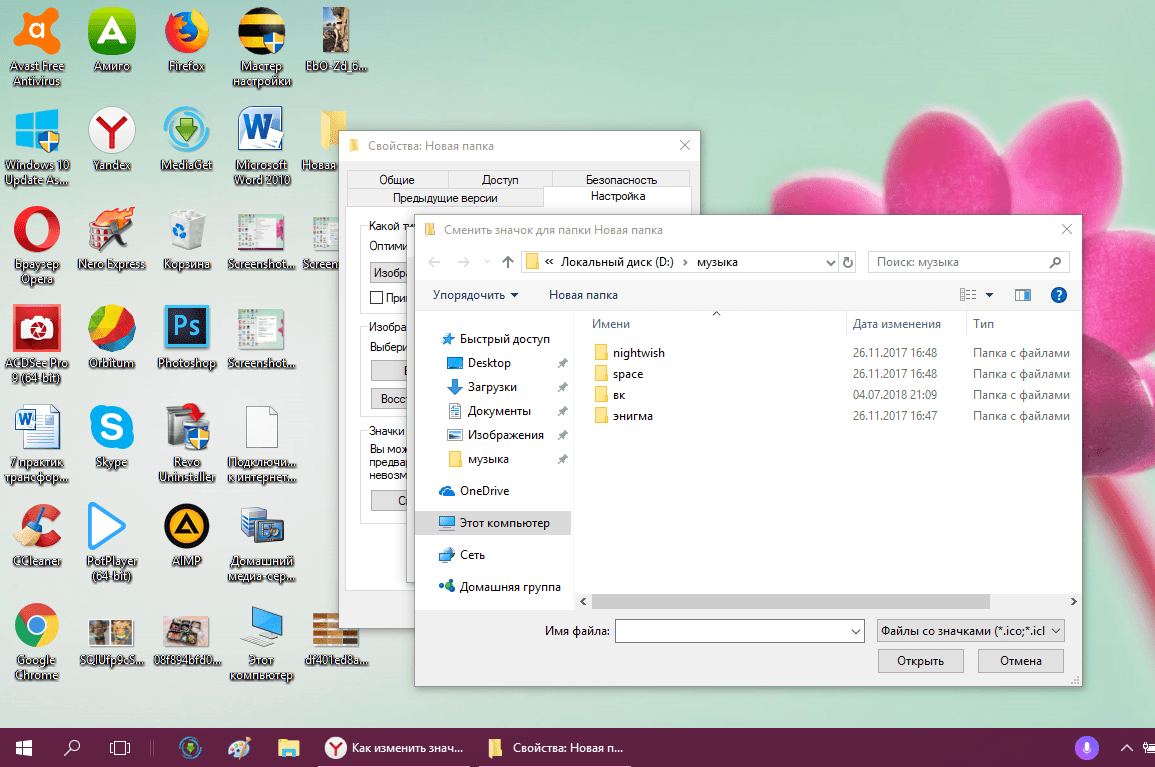
Now let's look at changing the icon for folders on the desktop. For this example, we will create a folder named "Icon" on the desktop. After its creation, we will go to its properties on the tab " Customization».

On this tab, click on the already familiar button Change icon. ... ...... After this action, the same window will appear in front of us, as in the previous examples.

The principle of replacing the folder icon with a third-party one, and not from the "shell32.dll" library, is the same as in the previous examples.
Create icons yourself
For this example we will use the program IcoFX... This program can easy to create various icons from bitmaps... For this example, we'll take a free photo from https://pixabay.com. There are thousands of free images to be found on this site.

We will also download and install the program IcoFX... After that, open the IcoFX program, and also open our image in it.

When you open the image, the utility prompts us to make a choice. We will focus on the option “ Create an icon from the image". This option will open our image at a reduced resolution, which can be saved for use as an icon.

After choosing a suitable icon size, you can save it. In our case, the size is 256 × 256. It is saved in the "* ico" file format. Below is an example of a "Shortcut" user shortcut with our icon.
Using IcoFX, you can create various icons from raster and vector images that are located on the desktop.
Customizing Label Sizes
Resizing desktop shortcuts is easy enough. To do this, go to the active desktop and right-click on it. After this action will open context menu, in which you need to go to the line " View».

In the image above, you can see that you can make the size large, regular and small. This setting allows you to adjust the size for monitors with different resolutions and diagonal. For example, for large monitors, you can reduce the size of the labels, and for small diagonals, make them larger. It is also worth noting that in the "View" item, you can pin shortcuts to the grid and pin them automatically to the desktop.
Finally
After reading this article, you will learn how easy it is to change icons in Windows 10. In addition, the article shows how you can create icons yourself from bitmaps. We hope the material will help our readers change icons in Windows 10, as well as create new ones.
Related Videos
If you are tired of the default icon design in Windows 10 and 7, you can change it. Who needs monotonous folders that are no different from each other? After all, you can choose individual icons for them. For books - a beautifully bound volume, for documents - a pile of papers with a paper clip, for music - sheet music, for games - a joystick. If you do the same for shortcuts and system catalogs, you get a unique theme. Find out how to change icons in Windows 7 and other versions. You can decide for yourself how the elements of the desktop will look.
There are several requirements for the picture. She must be:
- Square.
- In .ICO format.
- Suitable size (16 × 16, 32 × 32, 48 × 48 or 256 × 256).
- Go to Start - Run.
- In the window that opens, enter "regedit" without quotes and click "OK". The Registry Editor will appear.

- Click File - Export.
- Come up with a name for the backup and specify where to save it. If something goes wrong, you can restore them all.
Now go ahead and change the icons.
- Open the "HKEY_LOCAL_MACHINE" folder in the registry
- Go to "SOFTWARE".
- Then to Microsoft \ Windows \ CurrentVersion \ Explorer.
- Right click on "Explorer".
- Item "Create - Section".
- Name it "Shell Icons". If such a directory already exists in the list, open it.
- Call the context menu in the right part of the window and select "New - Stock parameter".
- Write down type 3 (three).
- Right-click on the newly created parameter "3" ("Three").
- Item "Change".
- In the "Values" section, specify the path to the icon along with the file name and extension.
- If you have a 64-bit system, open the HKEY_LOCAL_MACHINE \ SOFTWARE folder again.
- But this time go to Wow6432Node \ Microsoft \ Windows \ CurrentVersion \ explorer
- And repeat all the steps above.
- Restart your computer and evaluate the new kind icons.
Only edit the registry if you are well versed in the matter. Mix one parameter and errors will occur.
If you don't like the way folders and shortcuts look, you can change their icons. We only need pictures of a certain format. This will create a beautiful desktop.