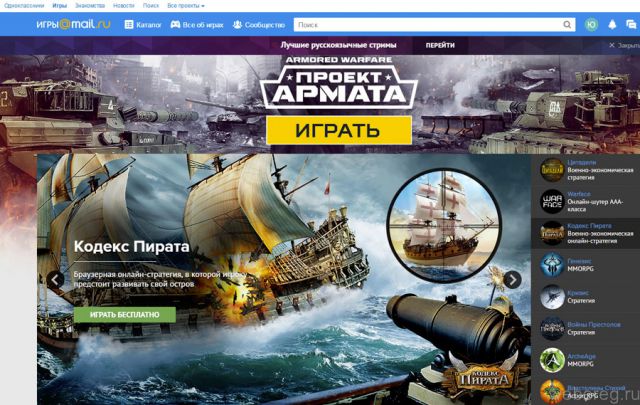
Mail.ru (pronounced "mail ru") is the largest web portal in the Russian-speaking Internet space. Combines email, social network, dating service, news feed and many others useful services... According to TNS (US Institute of Public Opinion), its audience is over 54 million people a month.
History of Mail.ru
The life of the legendary site began back in 1998, when the concept of “ global network"Was just beginning to penetrate the minds of ordinary PC users. A group of St. Petersburg programmers inspired by the success of Yahoo! in creating an e-mail, I decided to create and promote my own mail service.
Until 2001, the project was called Port.ru. And only after the rebranding, he received the name, which today all users of the Russian Internet, without exception, already know - Mail.ru. In 2002, the portal developers expanded the number of domains. It was already possible to register your mail not only at @mail, but also at @inbox, @bk, @list.
2003 became a year of innovations and improvements for Mail.ru. A search engine developed on the basis of Google WebSearch technology and the Mail.ru Agent messenger were introduced. In 2004, restrictions on the amount of memory for storing correspondence were removed from the post office. And with the advent of 2006, the free web service was replenished with new interesting sections - "Games" and "Video".
The company welcomed the new decade with new honors: in 2010 it was recognized as a well-known trademark, entered the IT market of the Baltic countries, opened a branch in Germany, and introduced a unique standard for electronic correspondence.
Today Mail.ru is the undisputed leader among the Runet IT companies. Every day Mail.ru e-mail delivers over 150 million letters to recipients living on all continents of the planet.
Well, let's take a closer look at the functionality of this portal.
Email options
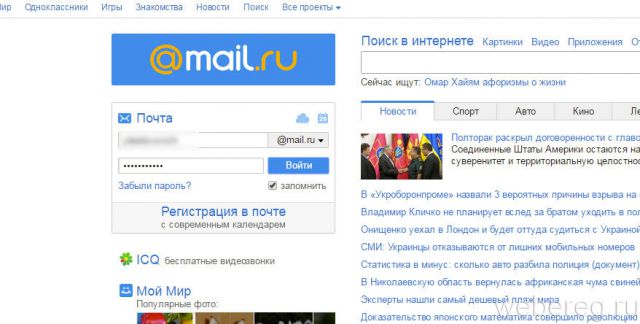
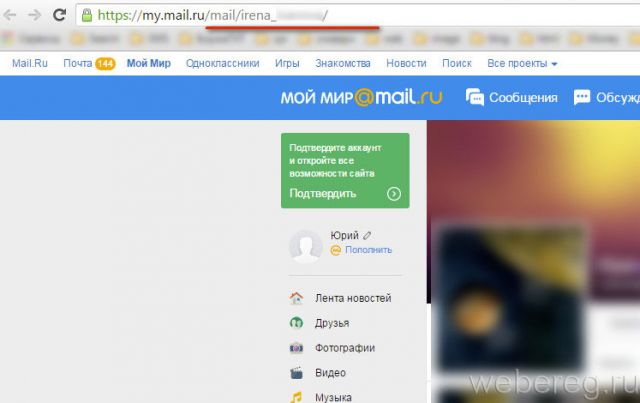
1. After authorization in the profile, the "Mail" section opens.
2. To view the letters, use the menu located under the "Write a letter" button:
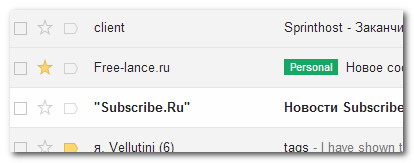
- "Inbox" - check if there are any incoming messages. A list of received messages (from whom, message header) is displayed.
- "Sent" - this is where the messages sent by you from your e-mail profile are stored.
- "Drafts" - a folder with unsent messages.
- "Spam" - messages that are automatically blocked by the spam filter are stored here. To delete all content from this folder, click the "Clear" option located next to it.
- "Trash" is a reservoir for deleted messages. Having entered this folder, they can be read, restored.
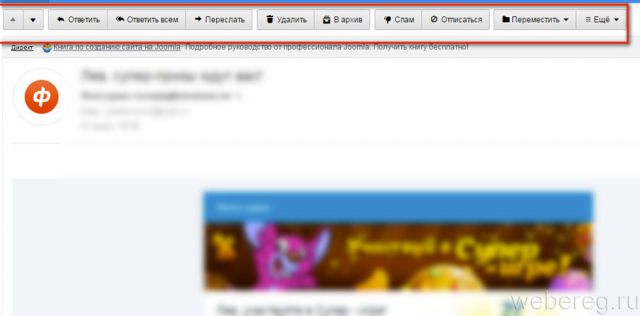
Operations on messages
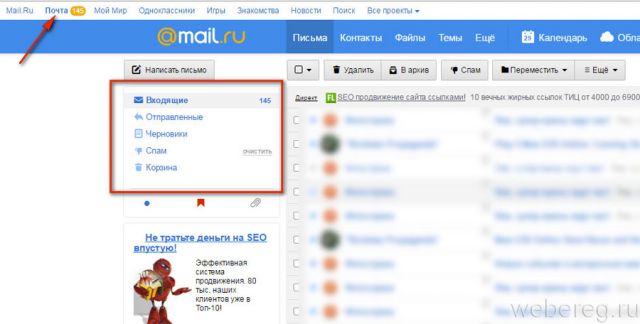
1. Before you do anything with a message, left-click the window next to it so that a checkmark appears.
2. Select the required operation in the panel above the list:
- "Delete" - delete the message (will be stored in the "Trash").
- "To archive" - placing a message in a separate storage (section "Archive" in the side menu).
- "Spam" - sending to the "Spam" folder (this way, you can manually filter potentially dangerous messages).
- "Move to" - send a message to the this section mail profile (displayed in the list).
When you open a letter, the panel expands. Additional options appear in it:
- Up and Down arrows- open, respectively, the previous and next letter.
- "Reply" - write an answer. Clicking the mouse opens a special form with the addressee's email address.
- Forward - send the received message to another recipient.
- "More" - an extended set of functions (creating a filter, adding to contacts, downloading to a PC, etc.).
Other sections of the profile
The sections menu is located above the e-mail control panel.
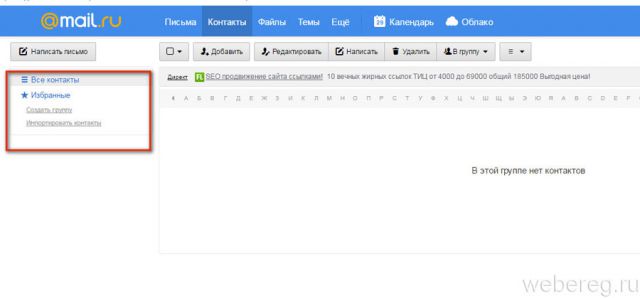
Contacts
The address book is a repository of contact information for your friends, comrades, business partners, etc.
To add a new contact to the repository:
1. Click the Add button.
2. Enter the addressee's personal information: first and last name, mailbox address, mobile number.
3. After filling out the form, click the "Save" button.
Contacts can be combined into groups (for example, "Family", "Classmates", "Employees"). Click in the block on the left "Create group" and add the necessary contacts to the created group.
To quickly go to the profile of a saved contact, click its icon. You can also use the alphabet search.
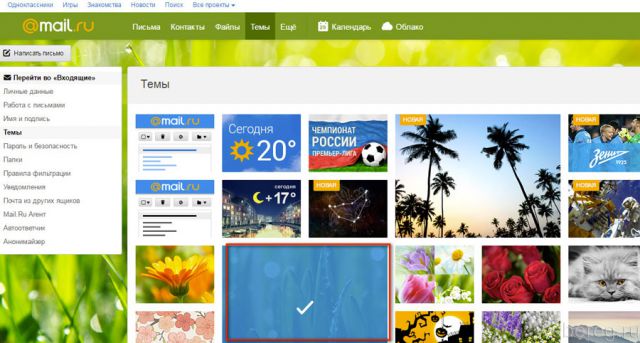
Themes
A selection of alternative graphic designs for the account.
Theme installation is carried out in one click. Click on the option you like in the tiled menu, and the page will immediately change.
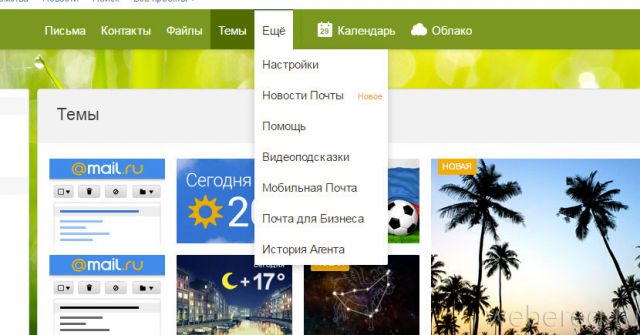
More
Through this additional menu, you can open the account settings panel, the service's news blog, etc.
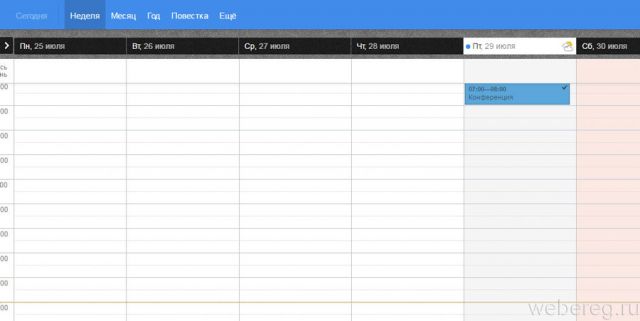
Advanced online organizer. Allows you to mark personal and work tasks, events, interesting events, etc. in the visual interface of the virtual weekly. When adding an event, you can indicate not only its name, but participants, venue and other information in the "Description" field. Plus, the Calendar supports various types of date markup - "Week", "Month", "Year".
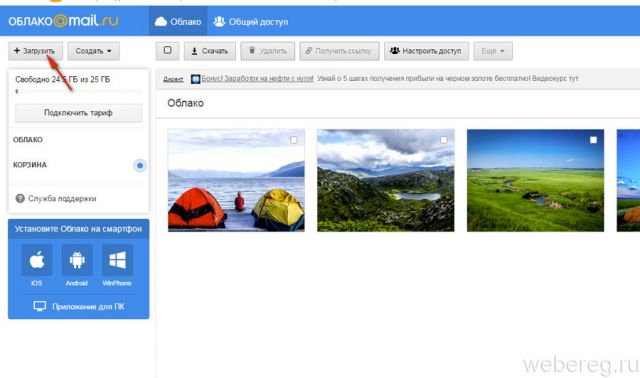
Cloud
Cloud file storage with a volume of 25 GB. Has access settings. Knows how to sort the uploaded content according to the specified criteria (by download time, in alphabetical order, by volume).
To place the file in the "Cloud", click the "Upload" button.
Services mail.ru
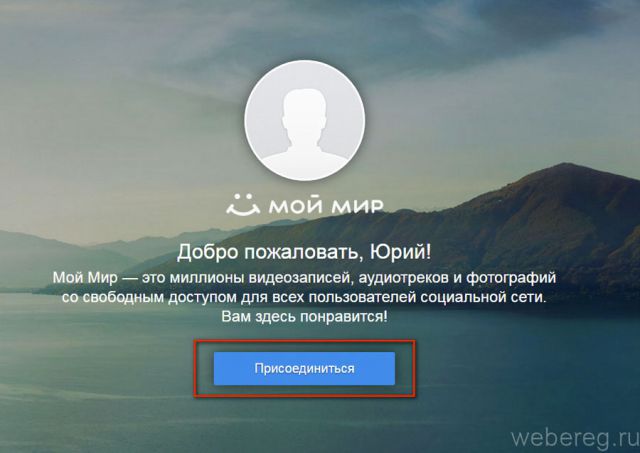
Social network integrated into the portal. In terms of functionality and interface, it is very similar to Odnoklassniki, VKontakte. Here you can communicate with friends, make new acquaintances, add to user groups according to certain interests.
To create a personal page in "My World", go to this section and click the "Join" button. Then follow the prompts of the service to fill out a personal questionnaire and complete a profile.
Games
Online games for every taste: browser, client, social, etc. Click on the section of interest. Go to the page of the game you like and follow the instructions to immerse yourself in the gameplay.
An online service that helps you find your soul mate. After going to the section, fill out the form and, if necessary, indicate the number mobile phone.
Restoring access to your account
If you forgot your login ...
Can't remember your username? Ask your friends, acquaintances with whom you communicate on mail.ru, to raise the correspondence with you in the profile. Messages from your account will contain a login - the address of the sender's mailbox.
If you do not have this opportunity, do the following:
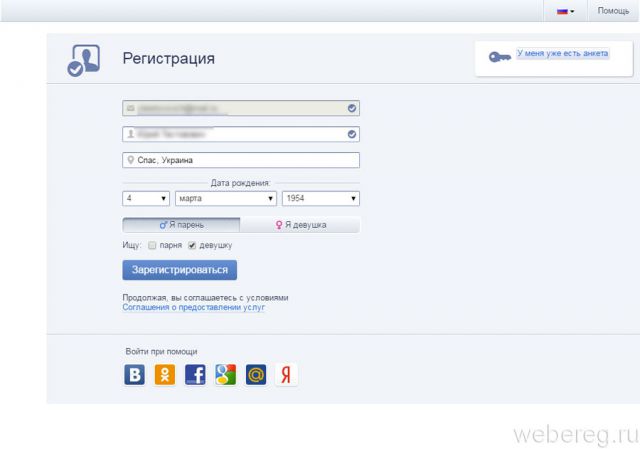
1. Create new account on the site.
2. Go to the "My World" section.
3. In the search box located in the upper right corner of your personal page, type your first and last name.
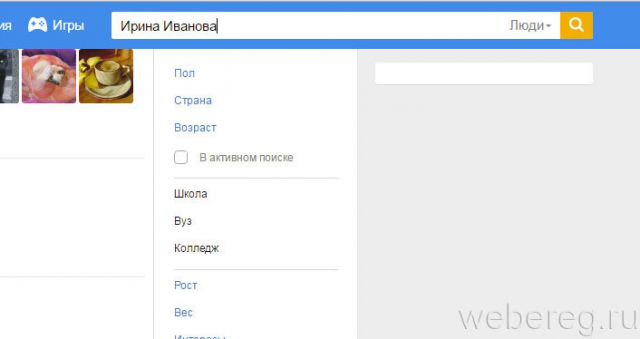
4. Find your profile in the search results (which you cannot enter) and go to it.
Everything! Now you can restore access.
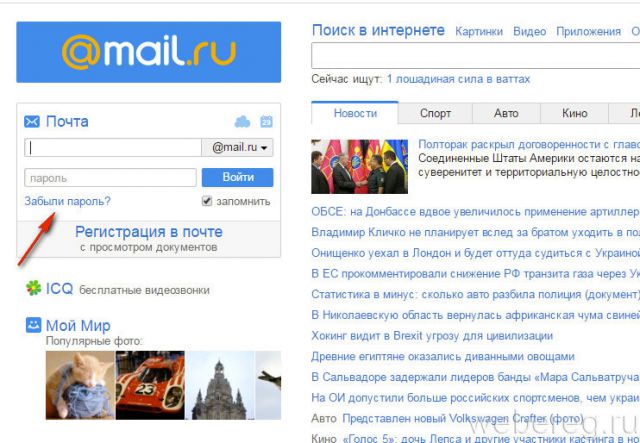
If you have lost your password ...
1. On the main page of the portal, under the fields for authorization, click the link "Forgot your password?"
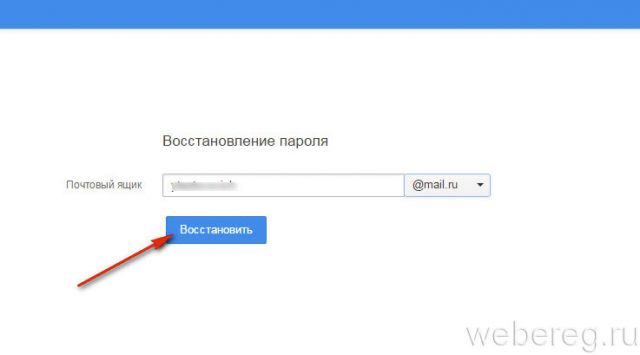
2. On the page that opens, click "Restore".
3. Enter your answer to Secret Question, exactly as indicated when registering an account.
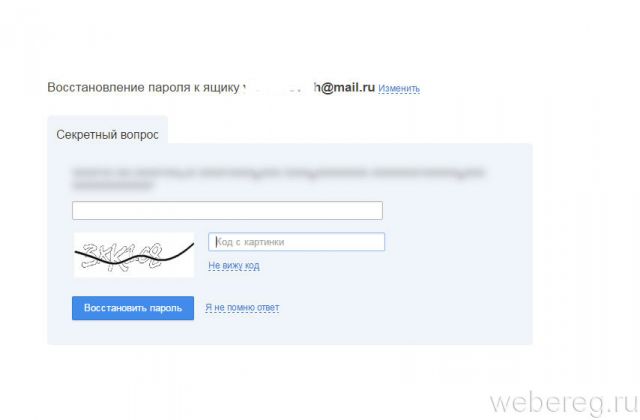
4. Enter the captcha: retype the code from the picture.
5. Click on the "Recover password" button.
Enjoy your time at Mail.ru!
Yandex Mail login and registration in the service - detailed instructions by process.
Yandex.Mail was organized together with a search service in 2000. Now it is quite famous and popular Post service in the CIS.
Registering a Yandex.Mail mailbox
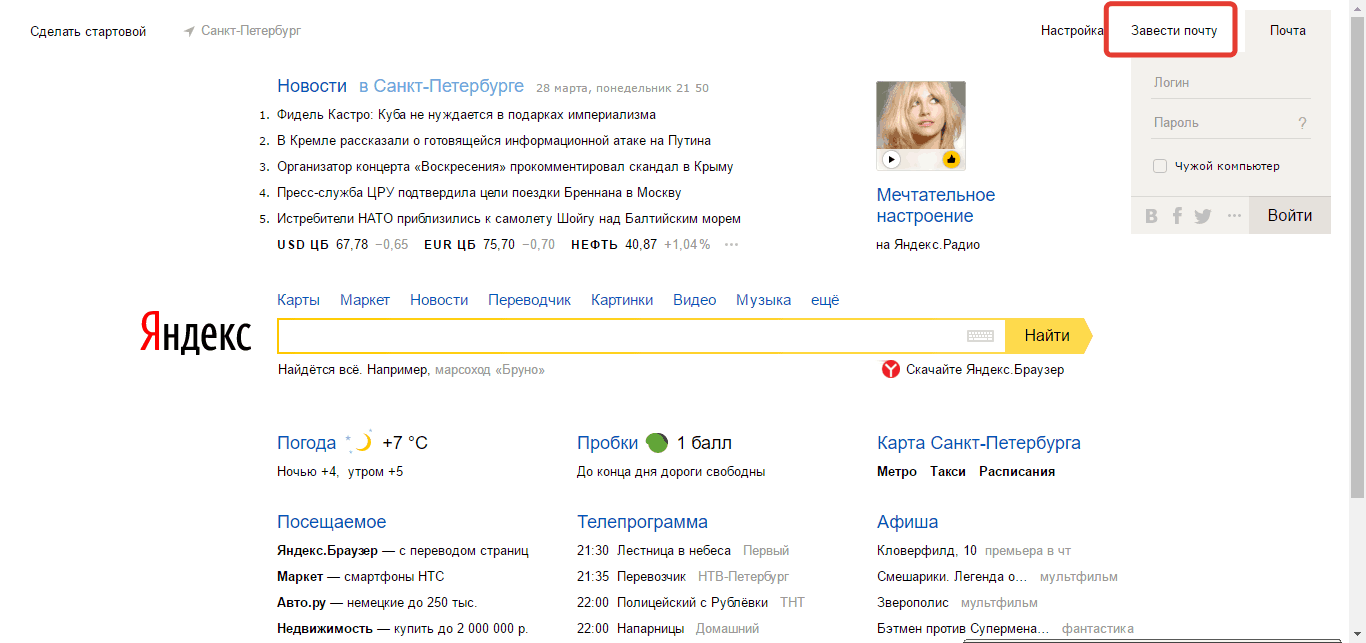
If the choice was nyandex mail, registering with us is as easy as shelling pears. First of all, you need to open the Yandex. At the top of the page, in the right corner there will be a form "Yandex mail login" with a link to create a mailbox.
You can also immediately open the postal service page and click the "Register" button. Anyone can enter through social media ( , Facebook, Twitter, Google etc.).
Clicking on the "Create mailbox" button will redirect the user to the page with the registration form, where you will need to enter some personal data.
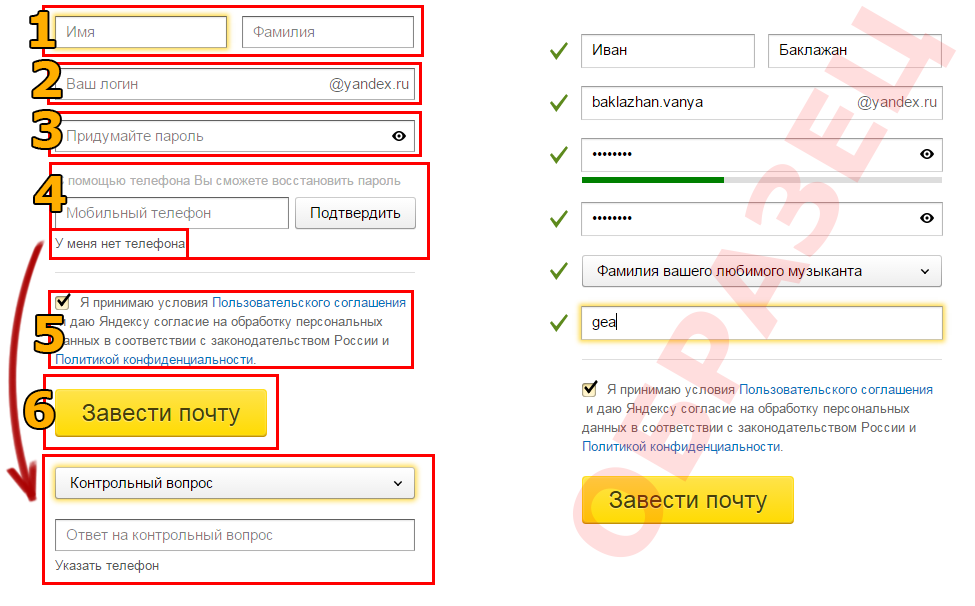
- FULL NAME. can be anything, even if you have entered someone else's data. Real name / surname is required only for work mailboxes. In addition, they greatly facilitate the search for a specific addressee.
- The system offers several login options, formed from the first and last name, but nothing prevents you from using your own established nickname or coming up with a new one.
- The password should be strong enough and easy to remember. It is recommended to use Latin characters with lower and lower values in one password. uppercase and numbers.
- You can attach a phone number to your mailbox. This will ensure that access can be quickly restored in case of hacking attempts. It is also possible to assign a security question instead of attaching a phone. For an example, only it will be enough.
- User agreement and privacy policy must be accepted. Without this, the creation of mail is impossible. The links provide information on the content of these agreements.
- The registration process is ended by clicking this button.

Note! Confirmation that the moment of registration is not a robot, you will need to enter a captcha.
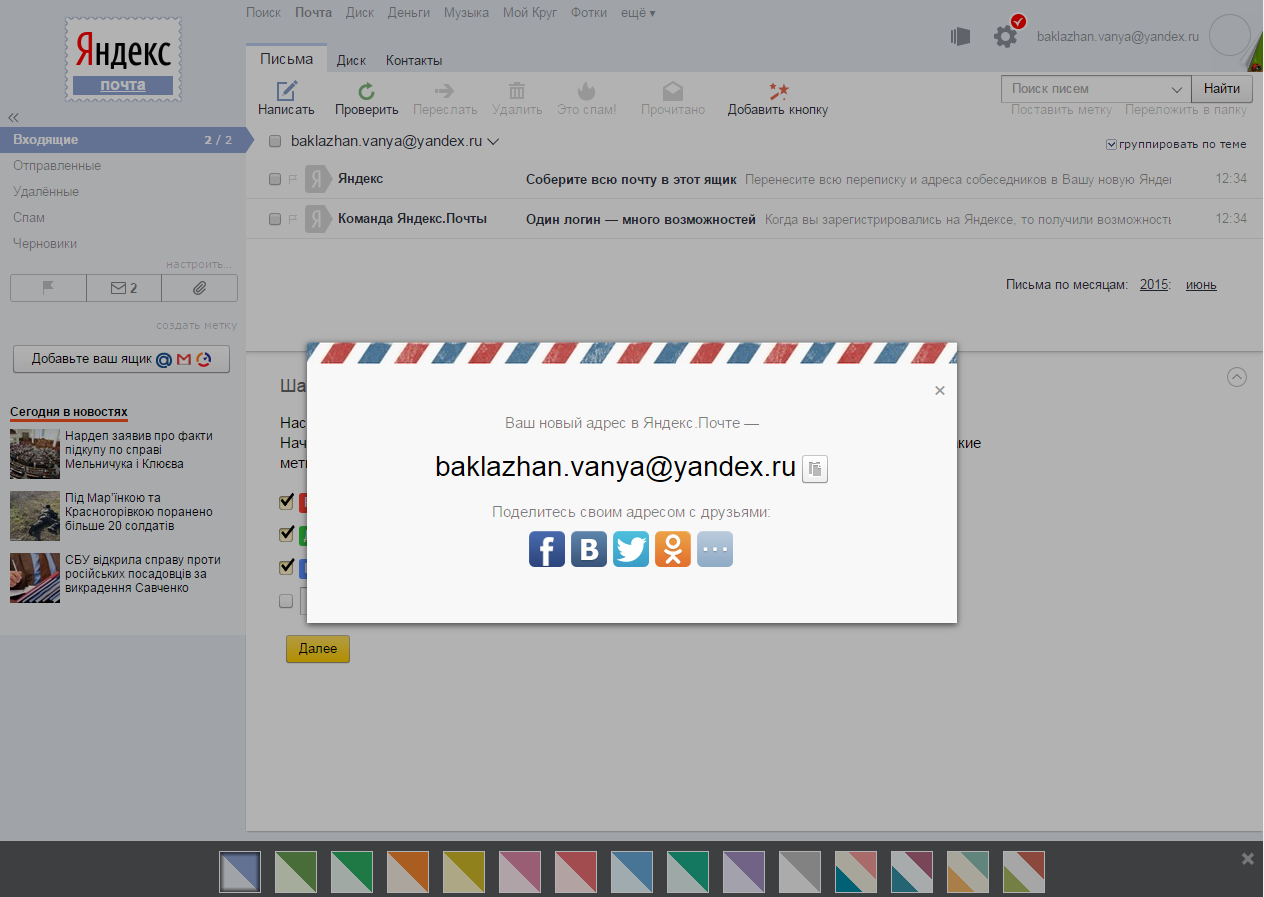
Actually, this is all registration on Yandex.Mail. It is Yandex mail that allows you to create new box in the least amount of time. After that, you can start customizing the box.
Setting up a new mailbox
Immediately after creating the address, the system will offer to go through several steps of setting up your own mailbox. The first one is adding a label for letters.
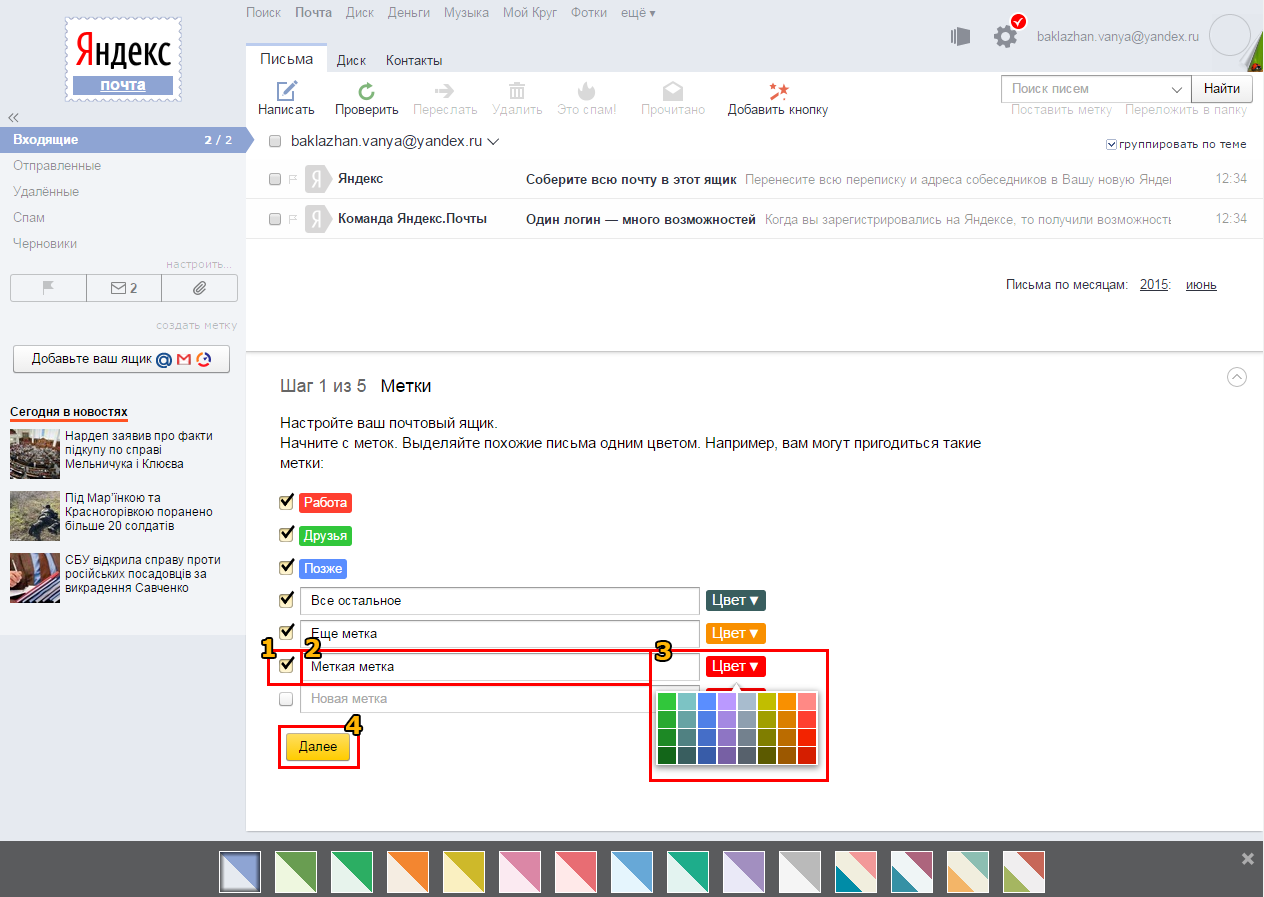
- To create a new label, you need to mark the checkbox opposite the "new label" field.
- Set the label name.
- Select the color of the label.
- Click "Next" to go to the next step of the setup.
You can add unlimited number of new tags. Subsequently, it will be possible to edit existing labels, set and rules, delete and add them in the mailbox settings.
The next step is to add a mailbox. With this option, all messages received to the specified mailbox will be redirected to the Yandex.Mail address.
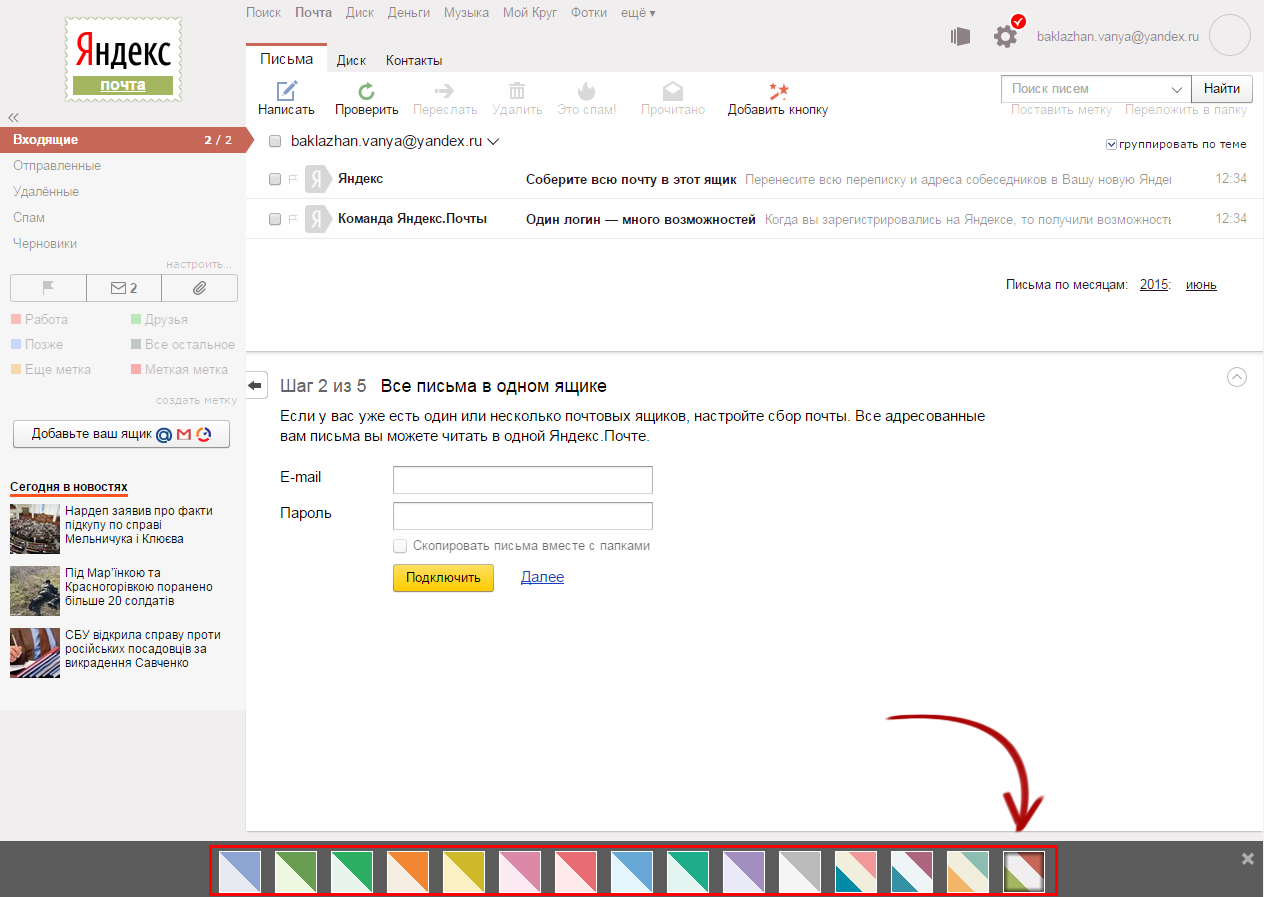
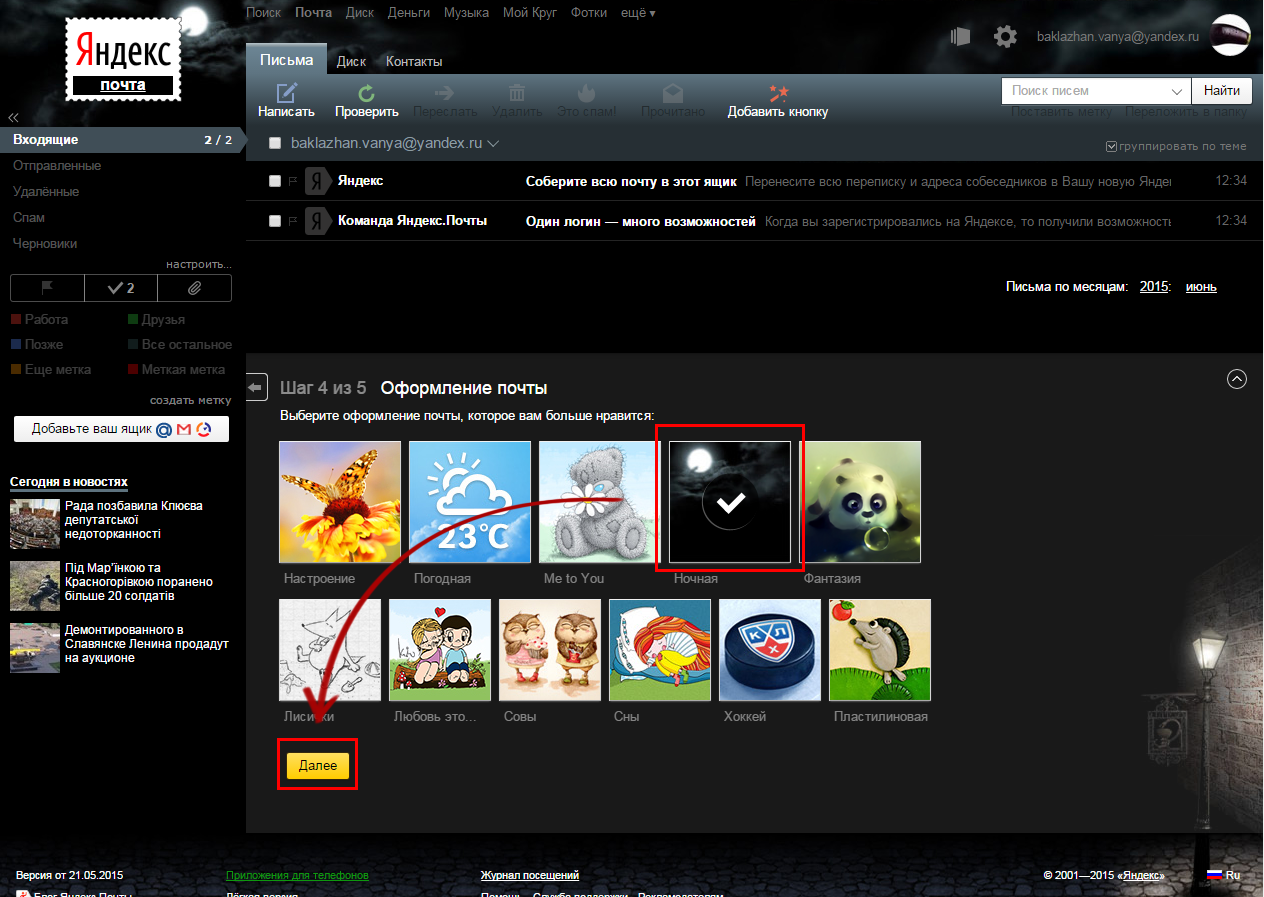
At the bottom of the screen, during the entire setup, a panel with a choice of page colors is available. Then there will be an opportunity to change appearance pages more dramatically.
The third step allows you to customize your personal information.
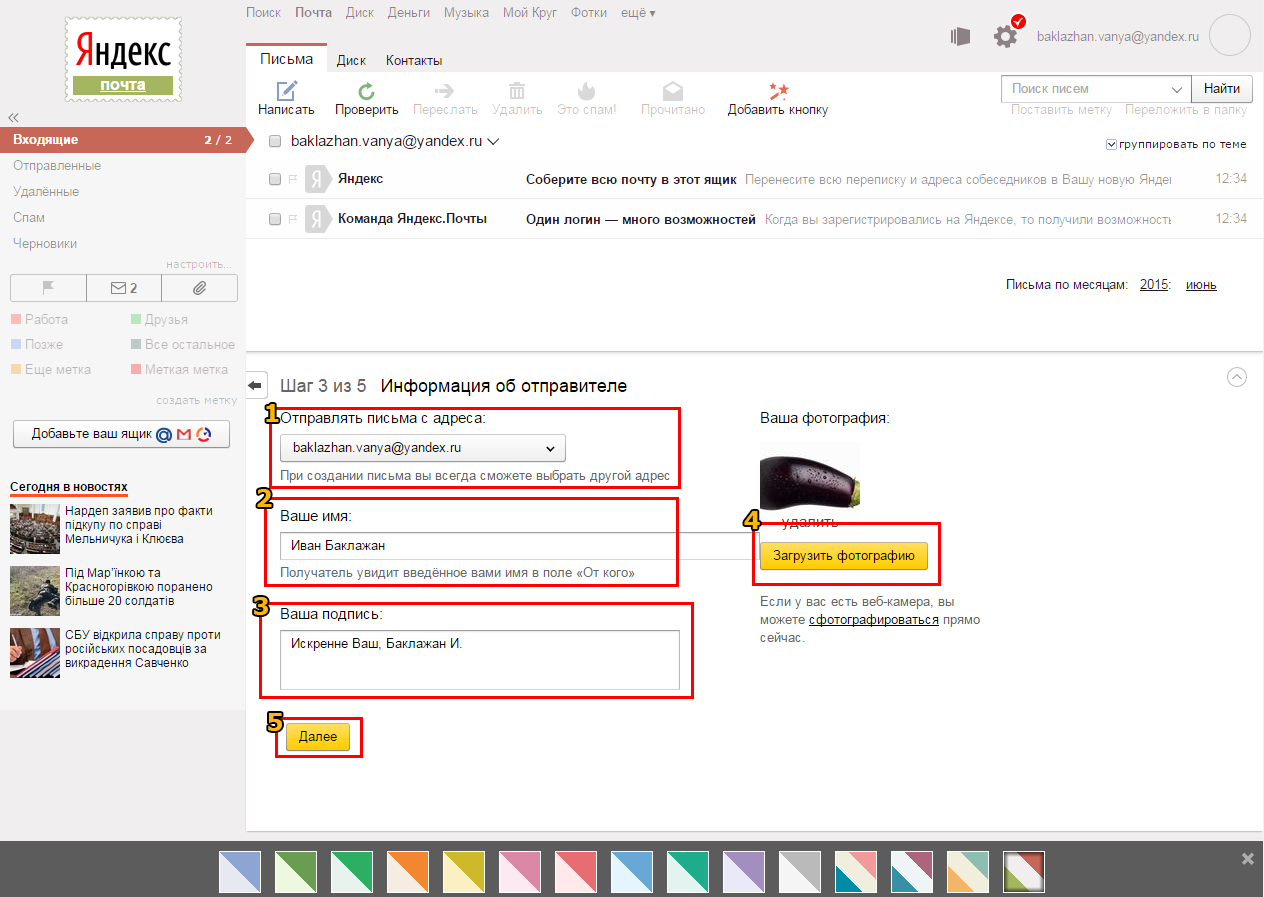
- Choose mailing address, which will be displayed in the letter to the addressees (yandex.ru, ya.ru).
- Adjust the name that the recipients of the letters will see.
- Select a signature that will be automatically added automatically to the end of each letter.
- Upload an avatar for easier identification.
- Click next and go to the next configuration step.
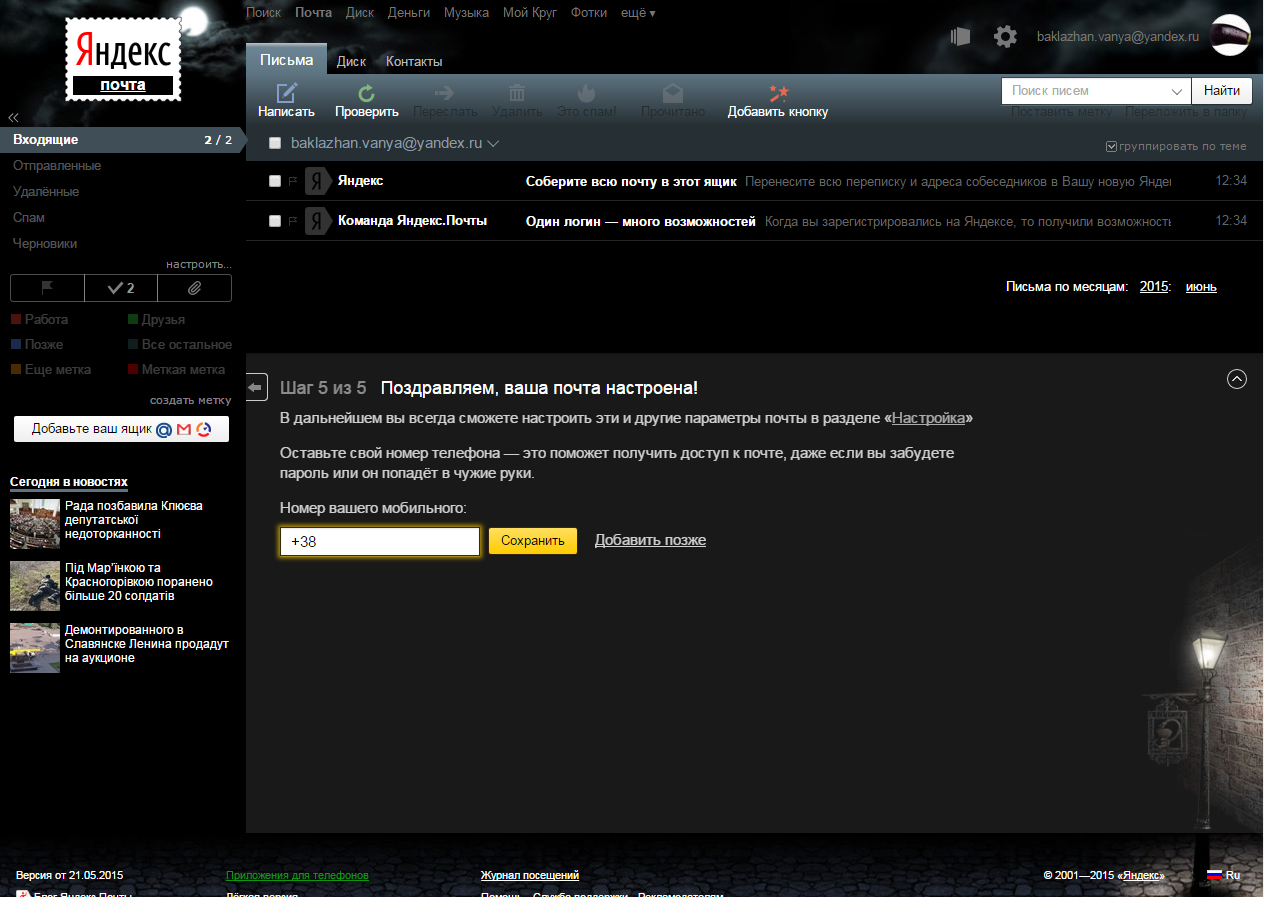
The fifth step once again offers the option to attach a phone number. If necessary - indicate the number and enter the confirmation code from SMS, if not - click "Add later". The mailbox setup is complete.
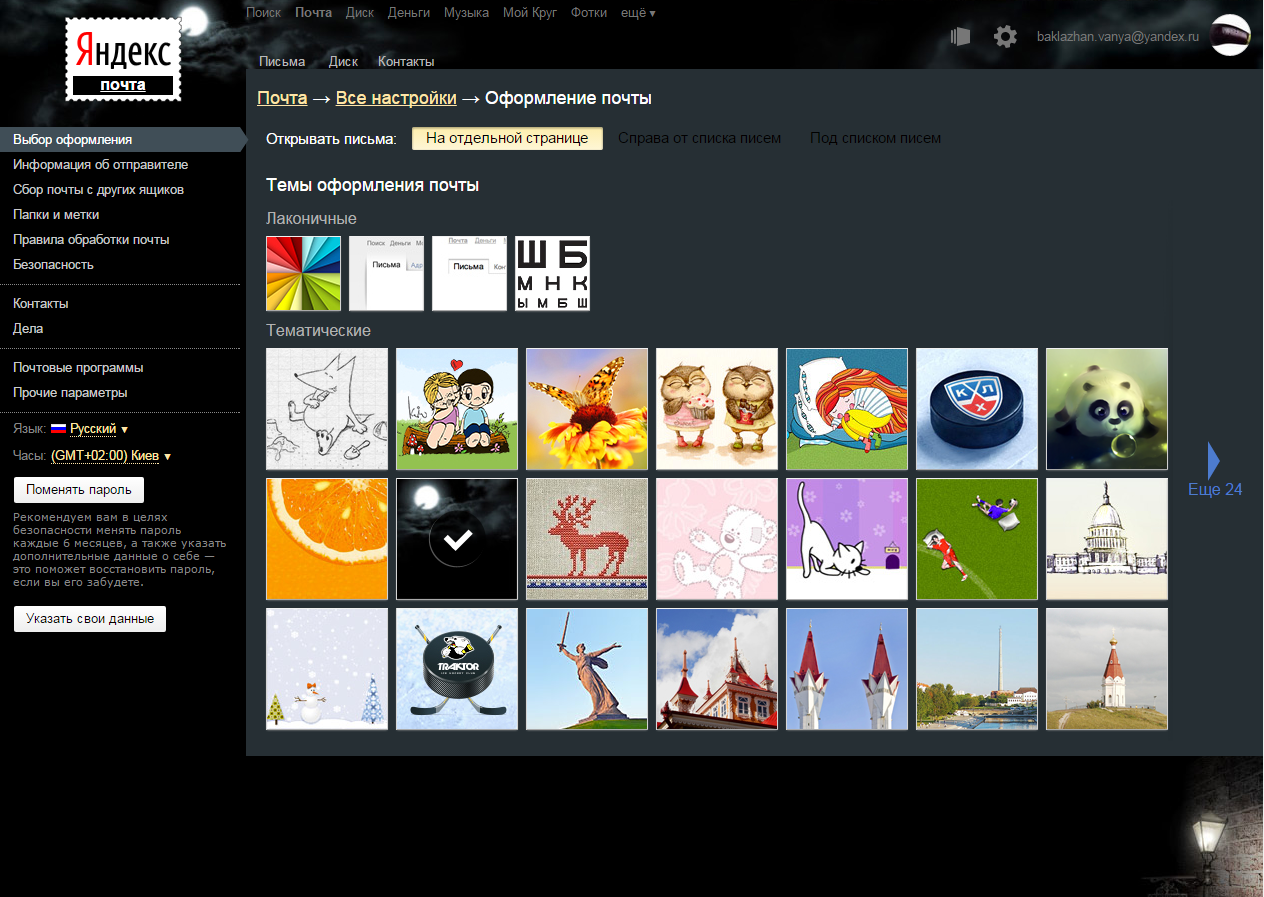
The finished page will look like this (depending on the chosen theme):
In the future, mail settings can be called using the inconspicuous link indicated in the image.
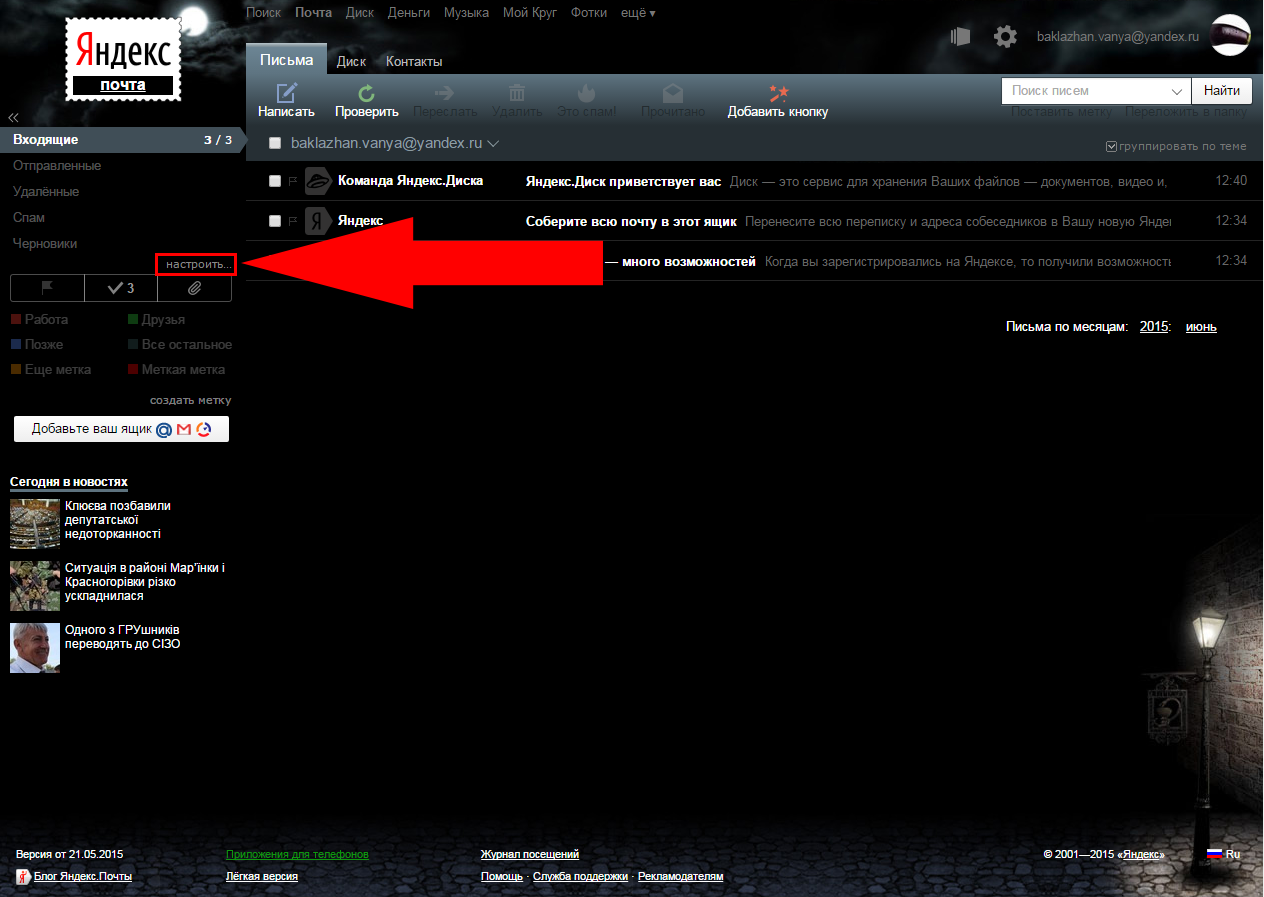
In the menu items, you can control the theme of the visual design of the postal service page and others important settings.
In particular, it is from here that you add folders and tags. It is enough to select the appropriate menu item on the left side of the page - "Folders and Tags".
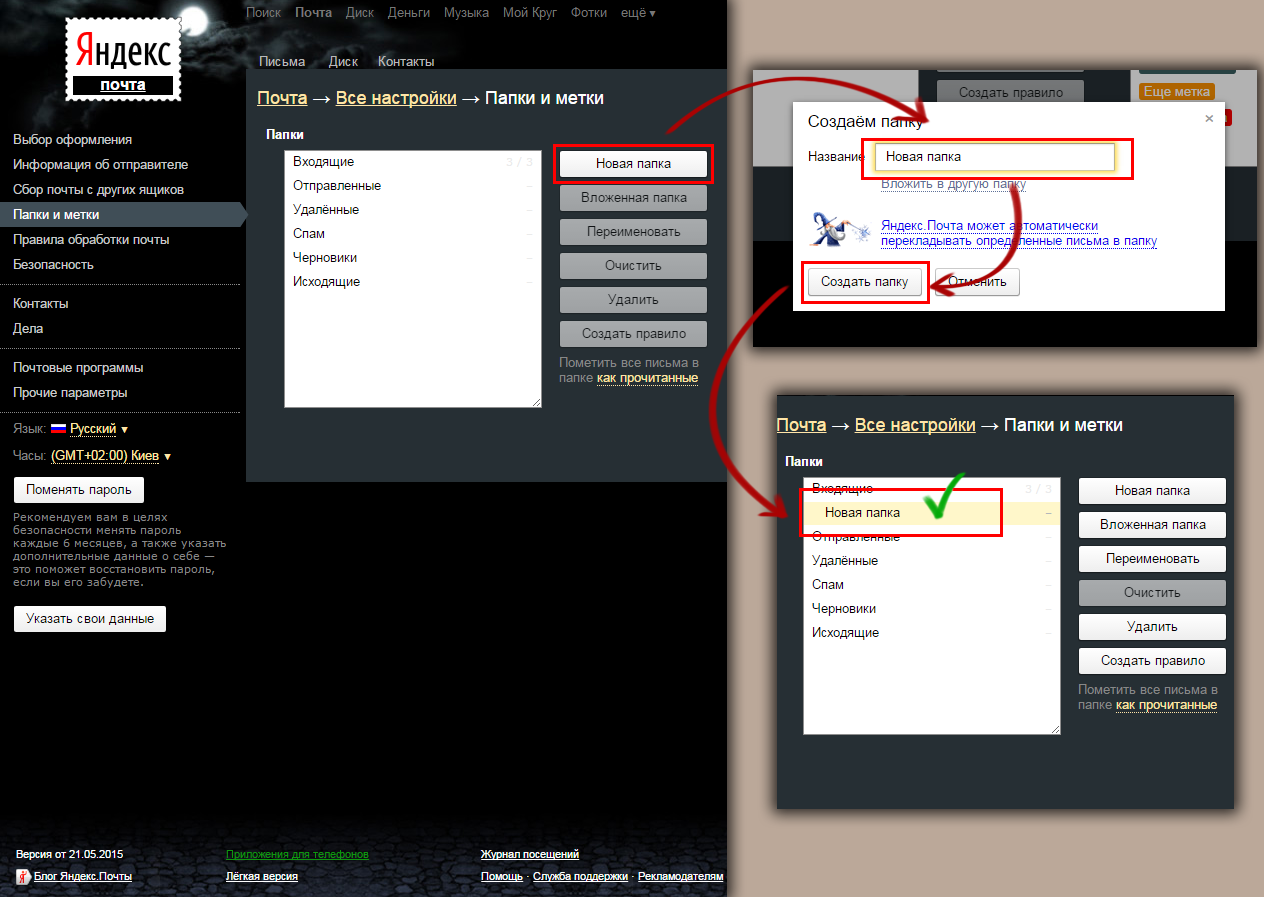
The left side of the settings block is reserved for folders. Here you can delete, add, clear and create rules for them. To add a folder, just click the " new folder", Give it a name and approve the creation with the" Create folder "button.
You can just as well delete it by highlighting and pressing the corresponding button.
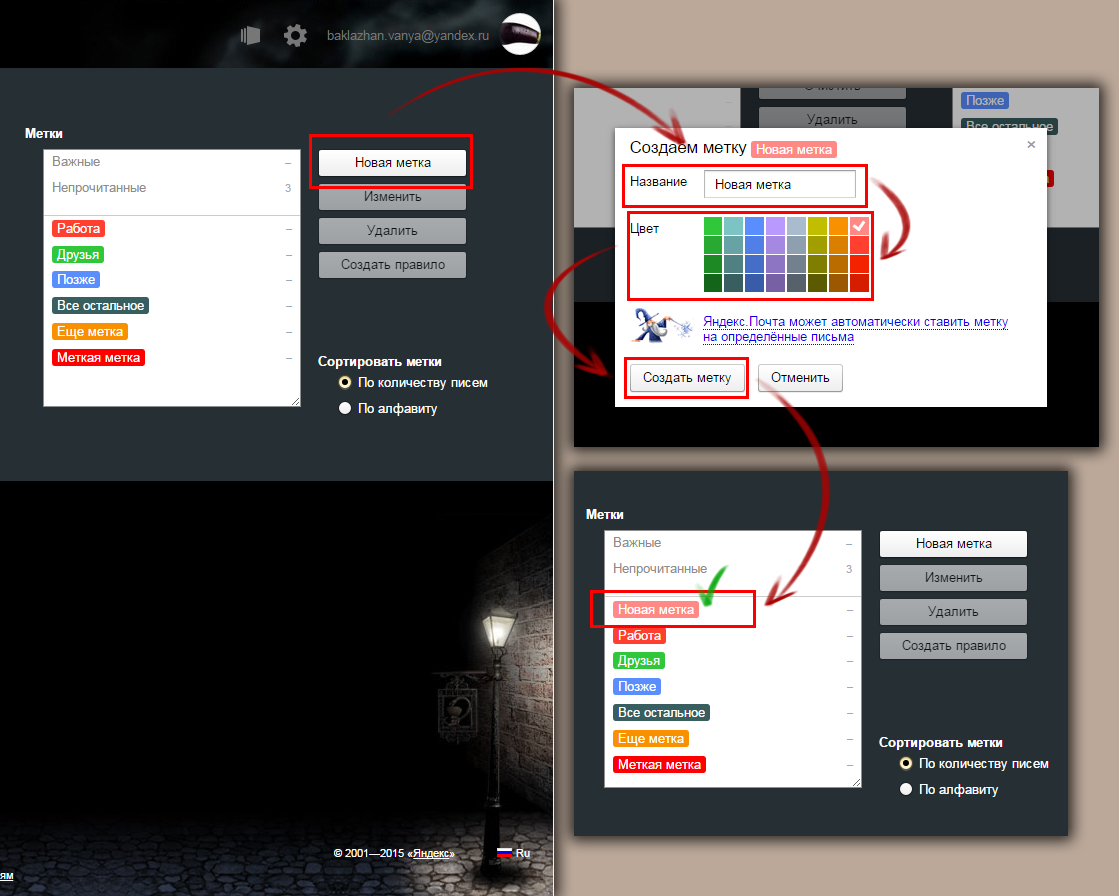
Working with labels is exactly the same, only to create them, you need to set the color to the label along with the name. Now the mailbox is finally ready to receive letters.
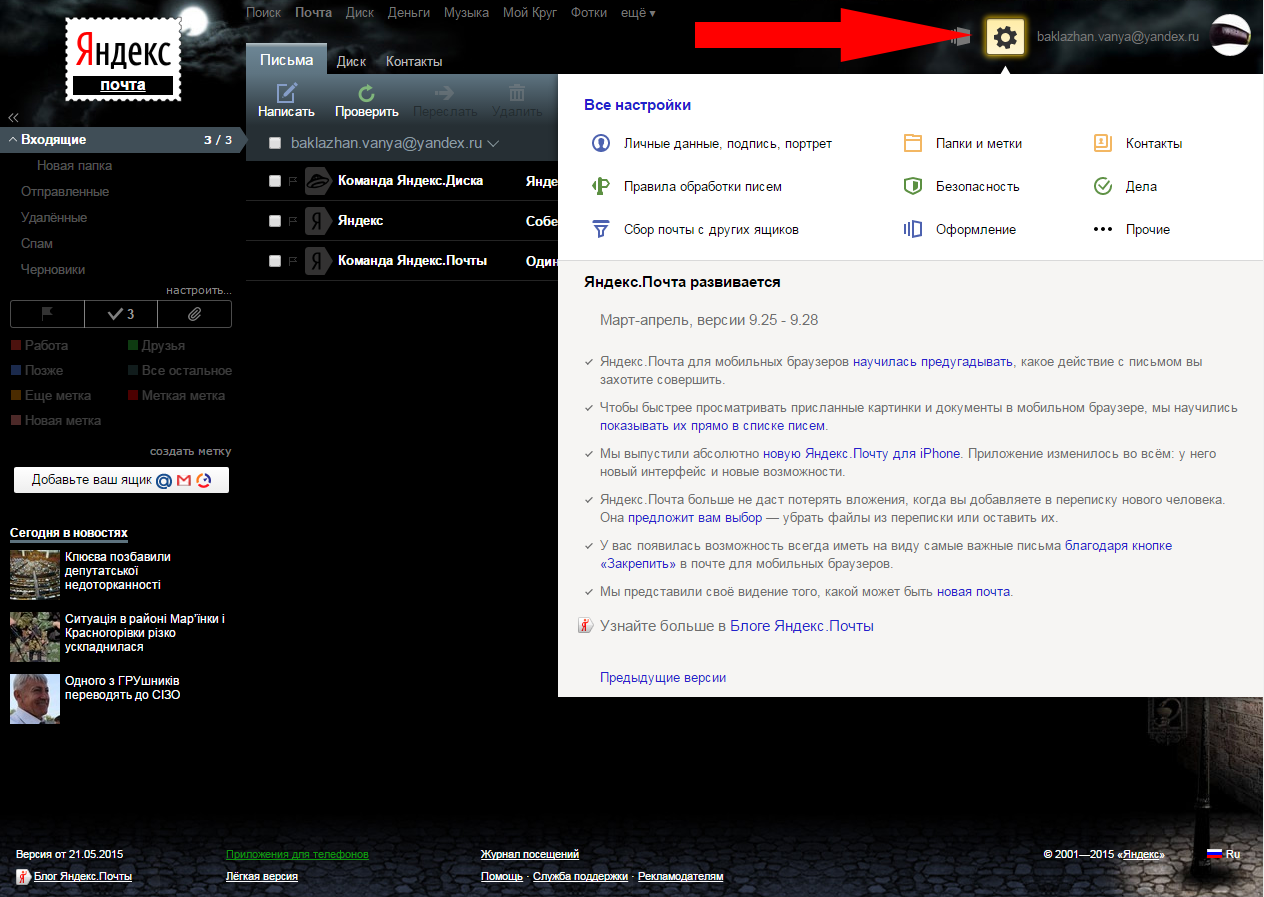
In addition, all settings are duplicated in the drop-down panel that appears when you click on the gear icon in the upper corner of the page, next to the name account.
The buttons in this panel redirect to the corresponding tab of the previously mentioned setup menu.
Yandex is known to millions of Russian users for its many successful products, among which mail stands out. When using an email account for the first time, users have various questions related to logging into an account, and this article will try to cover them all.
Registration of Yandex mail account
If you do not have a Yandex account, you can register it by going to the Yandex home page using this link and clicking the button "Start mail" located in the upper right corner.
A questionnaire will open in the next window, in which you must fill in all the columns. Please note that by default, a mobile phone number is required here, however, if you do not have it or do not want to specify it, click on the button "I do not have a phone" , after which you will be asked to come up with Security Question and the answer to it.
When you have finished filling in the fields, click the button "Register" , as a result of which you will gain access to your new account.

Login to Yandex mail
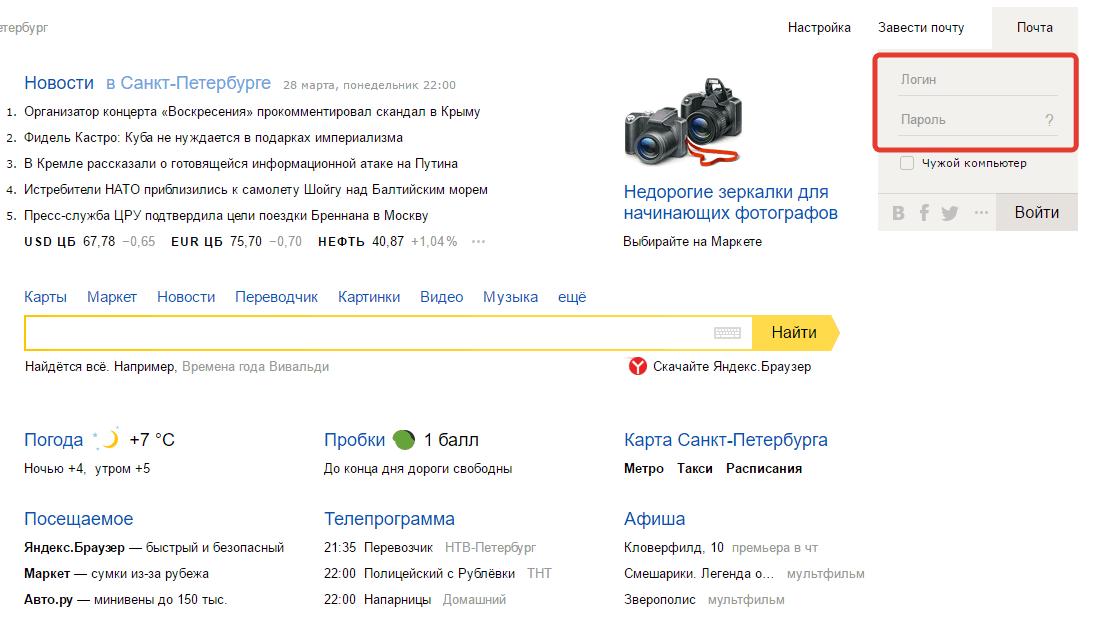
You can log into Yandex.Mail from the main window of the service page using this link. Enter your credentials in the upper right corner and click "To come in" .
I do not remember the password
As in any mail service, Yandex.Mail provides a password recovery system. Just click on the question mark icon located to the right of the column on the Yandex main page "Password" .
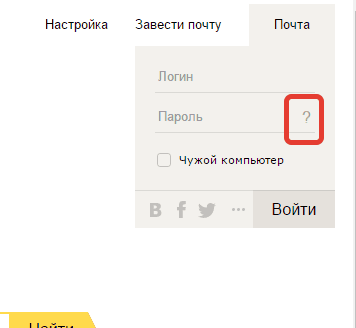
In the next window, you will need to enter your Yandex username, after which, to recover your password, you will need to answer a security question or receive a verification code to your mobile phone number (depending on what you specified during registration).
Login and password are correct, but mail does not open
First of all, make sure that when you enter the password, you have the desired layout on your keyboard, and that the Caps Lock key is disabled.
If that doesn't work, try updating your browser to latest version since often, outdated versions of web browsers refuse to work correctly with mail accounts.
If you still have problems logging into Yandex.Mail, visit this page, where the system provides basic tips for fixing different types of problems.
The longer you use your email, the more old messages accumulate in it. It is important to keep your mail in order so that you can easily find the letters you want. Fortunately, Gmail provides several powerful tools for managing your inbox.
In this lesson, we will talk about deleting emails, archiving, applying shortcuts, adding filters, and using the search function.
The most in a simple way fighting email clutter is to delete unwanted emails. However, there are other ways to keep your mail in order while leaving important emails. You can archive emails, thereby removing them from your inbox, or apply labels to them by categorizing them.
Removing unnecessary emails
It doesn't matter how many emails you receive, the likelihood that you will run out of space is extremely small. Gmail gives everyone a few gigabytes, which allows you to store a large number of emails and attachments. However, it is recommended that you delete unnecessary emails. The fewer letters there are, the easier it is to find the right ones among them.
To delete a letter:
- On the message preview page, click the Delete button.
If the message is part of a thread, the entire thread will be deleted. If you only want to delete this particular message, click on the drop-down arrow in the upper right corner of the message and select Delete this message.

Anti-spam
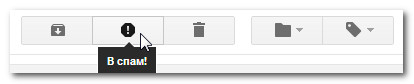
As a rule, spam (junk mail) is automatically placed in the Spam folder and does not go to your inbox. However, some emails manage to get through the Gmail spam filter. In order for the filter to work better in the future, you need to not just delete such letters, but click the Add to spam button! The process of adding a message to spam is the same as deleting it. The only difference is that at the end you have to press the B spam button!
Emails in the Spam folder are automatically deleted after 30 days, so there is no need to manually clean it.
Archiving emails
Sometimes you need to remove emails from the inbox, but not delete them. Gmail allows you to archive emails so they no longer appear in your inbox. But the main thing is that access to them remains, in fact, this is a safe alternative to deletion.
To add a message to the archive:
- On the message viewing page, click the Archive button.
To view emails in the archive:
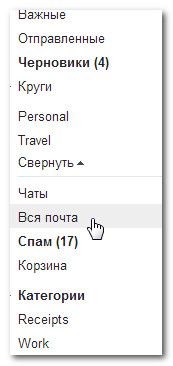
- On the left menu, click the More arrow and select All Mail. All your letters, including archived ones, will appear in the list.
Managing multiple emails
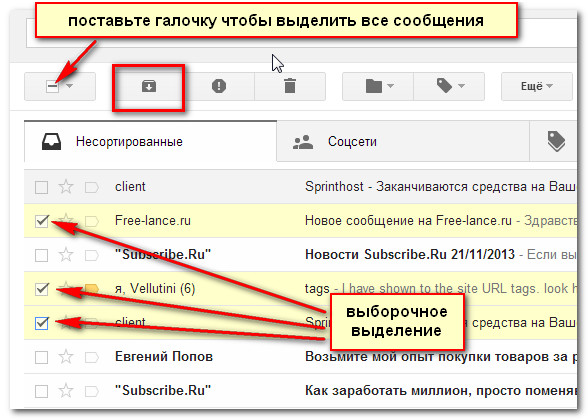
You can simultaneously delete, archive or add to spam several emails at once by selecting them in the inbox list. To do this, you need to mark each message with a tick and click desired buttons... You can also click on the top selection box to select all letters visible on the page.
Working with shortcuts
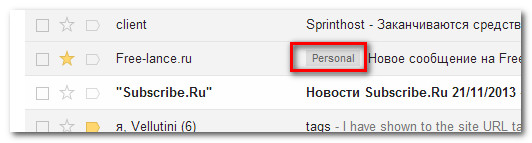
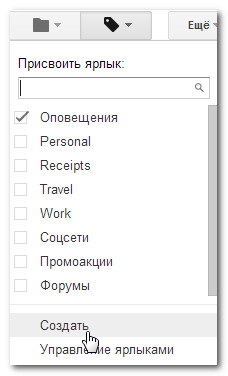
Labels help you organize emails into categories and make it easier to find them. Applying a shortcut is similar to placing an email in a folder, with the only difference that you can apply more than one shortcut to an email. For example, if you receive a message about a trip with a company, you can label it Travel and Work. You can label your most important emails or all - the choice is yours. You can create new labels and choose a color for each one.
To apply a shortcut:
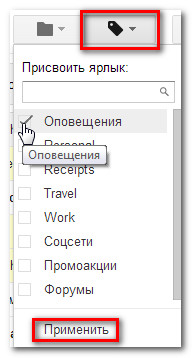
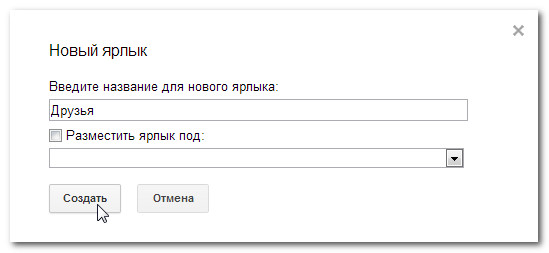
To create a new shortcut:
View Labeled Emails
Once you've organized your emails into labels, you can easily view all emails with a specific label. So the time spent tagging letters pays off. For example, you can view all emails labeled Travel so you don't get distracted by other emails and see the details of your upcoming trip.
To view emails with labels:
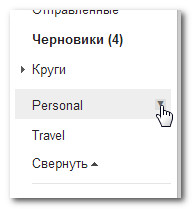
- In the panel of the left menu, click on the name of the desired shortcut.
- Gmail will show all emails with this label. The name of the shortcut appears in the search bar.
- To see all emails, click Inbox in the left menu bar.
Some shortcuts may be hidden. If you don't see the shortcut you want, click More. Here you can also click Manage shortcuts and specify which shortcuts to hide.
To select a label color:
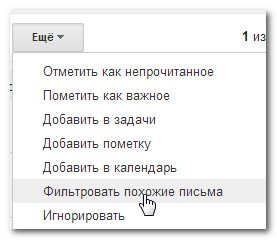
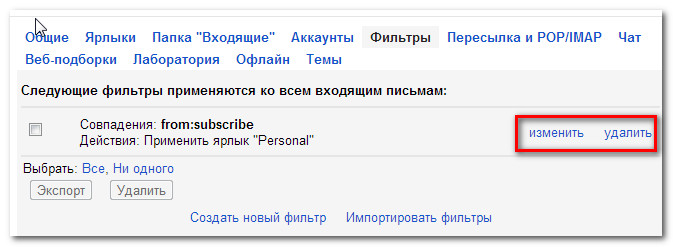
Creating filters
Filters can save you a lot of time by automatically assigning labels or deleting emails as soon as they arrive in your inbox. You can create filters for specific senders, recipients, topics, or even words in the body of an email.
To create a filter:
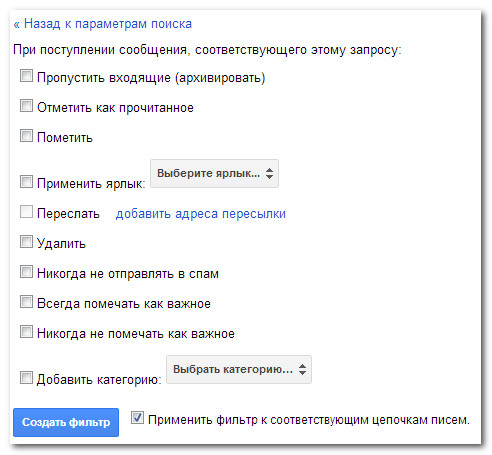
To change or remove filters:
Search for letters
The Search Mail function allows you to Google search by your mail. This means that you can find any letter in your Gmail... The search goes through all parts of the letters, so you can find the letter, even if you forgot from whom.
To start a search:
- At the top of the page, enter your search criteria in the search bar and click Search.
- The search results appear on the inbox page. You can click on the email and read it, or do some other search.
If you can't find the email in any way, click Show Search Options to perform an advanced search.
Currently, the Internet user has the ability to choose from a large number postal services where he can create e-mail. Yandex, like others postal services, has its own characteristics.
Yandex, which was originally created as search engine, today also represents a fairly convenient postal system.
Logging into a mailbox
Get into your mailbox registered on Yandex, there are two main ways. The first one is to enter the box directly from home page site: typing in address bar yandex.ru, in the upper right corner you will see a login form. It, like most other mail systems, requires entering two main parameters - a username and a password: their correct combination allows the system to make sure that it is the owner of the mailbox or the one to whom the owner has entrusted this data attempting to enter the mailbox.Another way to enter the mailbox is to type in the address bar directly the address of the page of the mail system Yandex.Mail - mail.yandex.ru. Here you will also be prompted for your username and password. At the same time, both versions of the pages leading to the mail system also allow you to log in using an account in one of the popular social networks.
If you have forgotten your password, left-click on the "Remember password" link: the system will prompt you to enter the username for which you need to recover the password, and the security code provided on the same page, which allows you to protect the site from robotic requests ... After entering the necessary information, you will be taken to the password recovery page: depending on what information you provided to the system during registration, you can do this using a backup mailbox or your phone number.
Checking mail
Once you log into your email inbox, you will automatically be taken to a page that displays your incoming messages. If you want to view another folder, for example, view sent letters, you must select the appropriate tab on the left side of the page. You can open the text of the letter by simply clicking on its title with the left mouse button.By default, newer messages in the Inbox are at the top of the page, and the rest are sorted based on the outdated date of arrival. It should be noted that the Yandex.Mail system interface is equipped with a fairly convenient tool: it automatically highlights the headers of those incoming messages that you have not yet read in bold. This allows you to quickly identify unread messages without wasting time scrolling through the entire mail feed.